
Worried your roof plan will fail inspection or sag after the first big storm?
You are not alone. One missed detail can turn a smooth build into delays, rework, and extra cost.
Here is the truth: Many roof problems do not start with bad weather or cheap materials. They start when teams skip steps in the truss design phase. A roof truss design checklist is not paperwork. It is your safety net against major failures.
In this guide, we walk through what engineers check before they approve any truss design, so you can build with confidence.
New to the basics? Read our Roof Truss Design Guide for spans, loads, and code steps.
Build Smart: Your Roof Truss Design Checklist
Skip the guesswork and start with a plan that passes review the first time. This checklist lines up loads, spans, spacing, and details so the install day feels easy, not risky. Ready to lock in the basics before you order a single truss?
Confirm Your Code Path and Permits
What to Do
Call your building department or check the permit portal. Write down the code edition, local amendments, roof live load, wind speed, exposure, and any seismic category. Note submittals like stamped truss drawings, bracing notes, and an installation plan.
Why does this matter? Codes set the rules for loads, connectors, and bracing. If you guess, you risk redesign, delays, and extra cost. When you confirm the rules first, every later choice becomes faster and safer.
Inspector hint: Bring a one-page sheet to the plan review that lists your code edition, design loads, and submittal items. Reviewers appreciate quick clarity, and your file moves sooner.
Quick checklist
- Code edition and local amendments recorded.
- Roof live load, wind speed, exposure category, and seismic category noted.
- The submittal needs to be confirmed, including stamped truss drawings.
- Permanent bracing instructions are planned for the layout sheet.
- Site layout marks agreed for inspection day.
Map Climate and Site Loads
What to Do
Collect site values before any layout work. Record ground snow load, roof live load, wind speed, wind exposure, mean roof height, and seismic design category. Note the rules on unbalanced snow, drift at hips and valleys, sliding snow, and rain on snow. Save the source for each value in your job file.
Why is it needed? Loads decide member sizes, spacing, connectors, and reactions. If the numbers are off, you get uplift surprises, cracked ceilings, or a redesign that costs time and money.
Reality check: Two streets in the same town can fall into different wind exposure categories. A small change can force stronger ties and more bracing. Verify the map. Do not assume.
Quick checklist
- Ground snow load and roof live load confirmed.
- Wind speed, wind exposure, and mean roof height were recorded.
- Seismic design category noted with site class if known.
- Unbalanced snow and drift rules captured for the roof shape
- Internal pressure coefficient and risk category are listed.
- Source links saved in the job file for plan review.
What to Do
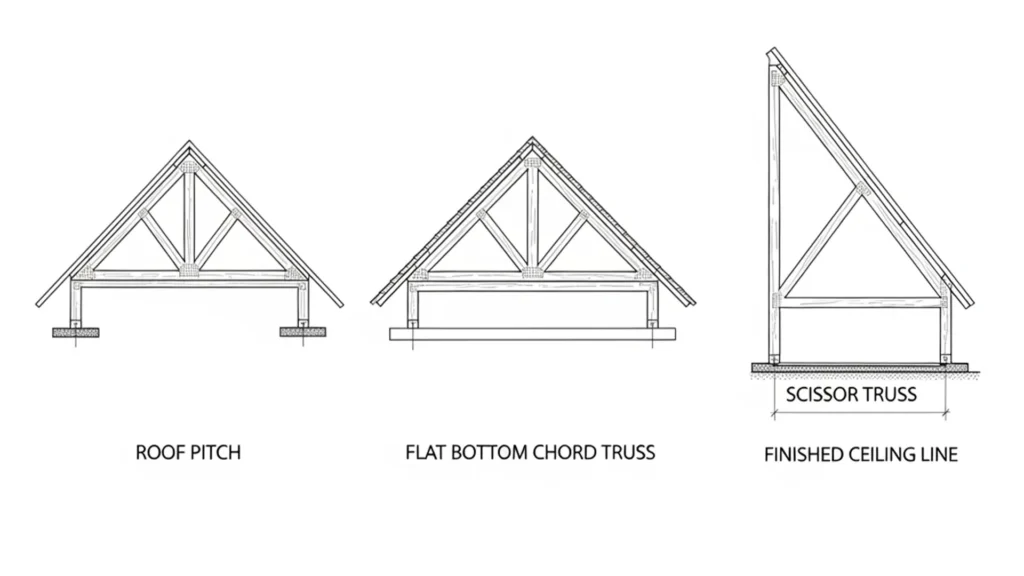
Pick a roof pitch that fits the look and sheds water well, then match a truss type to the room below. If you plan to build asphalt shingles, confirm that the pitch meets the code and manufacturer rules. The minimum is often 2 in 12, and slopes below 4 in 12 need special underlayment.
Why important? Pitch affects drainage and roof covering options. Truss type affects headroom and movement. Scissor trusses create a vaulted ceiling but can push outward and move at the ridge. Without limits and bracing from the engineer, finishes can crack.
Finish saver: Choose the truss that fits the room use: Fink or Howe for simple spans, attic truss for storage, or scissor for a vaulted look. For a quick primer on common truss families, see this university overview.
Quick checklist
- The target roof pitch is confirmed with your roof covering choice.
- The truss type was chosen to match the ceiling style and span.
- Engineer notes on deflection and any lateral movement for scissor truss plans.
- Ceiling finish strategy at the ridge is set to avoid cracking.
Select Material Early: Timber or Steel
Pick the frame that fits your span, climate, and schedule, then lock it in so you do not redesign later.
| Decision factor | Timber trusses | Steel trusses | Use this when |
| Typical spans and design references | Efficient for most home and light commercial spans. See the USDA Wood Handbook for properties and design basics. | Excels at longer clear spans and higher reactions. Standard practice follows the AISC Steel Construction Manual. | Homes and small commercial buildings with standard spans → timber. Long open bays or special loads → steel. |
| Lead time and fabrication | Wide supplier base with fast shop drawing cycles in many regions. | May need longer procurement and shop time depending on coatings and market. | Need quick approvals → timber. Complex geometry with welded or bolted frames → steel. |
| Coastal and high moisture exposure | Use preservative-treated members where needed and pair with compatible fasteners. Termite inspection is recommended in high-risk zones. See USDA guidance. | Plan corrosion-resistant coatings and hardware. Keep metals compatible to avoid galvanic corrosion. See FEMA P-499 coastal fact sheets. | Coastal projects or flood-prone areas where corrosion control is critical. |
| Connections and hardware | Nails, screws, and plates sized per engineering. Follow species-specific values from the Wood Handbook. | Bolted, welded, or proprietary connectors per the AISC Manual and fabricator specs. | Choose what your local trades install well and what the drawings call for. |
| Cost drivers | Species and grade, truss count, plate sizes, bracing, and freight. | Member sizes, connection details, coatings, and fire or acoustic coverings, if required. | Ask for itemized quotes so you can compare fairly. |
| On-site handling | Light and easy to lift. Protect from rain and keep bundles cribbed. | Heavier picks and tighter staging. Verify crane reach and safe lift paths. | Small lots or tight access may favor timber. |
Cost guard: Ask every bidder for an itemized truss quote that lists spans, spacing, plate sizes, connectors, bracing, coatings, and freight. This makes steel vs. timber comparisons fair and prevents surprise add-ons.
Set Spans and On-Center Spacing
What to Do
Pick a target spacing early, then confirm it against your roof deck rating and your engineer’s serviceability limits. Many homes use 24 inches on center, but your spacing must match the panel stamp and the truss design criteria in ANSI TPI 1.
APA explains how span ratings work on the panel stamp, for example, 24 slash 16, where the left number is the maximum roof support spacing in inches.
Why does this matter? Spacing drives panel thickness, nailing, and deflection. Code tables address minimum lumber decking thickness at given spacings, and truss deflection and vibration limits come from the truss design standard TPI 1, which your truss engineer follows. Tight alignment here prevents a soft roof feel and cracked finishes later.
Builder note: If you want lighter panels or a stiffer ceiling finish, adjust spacing, panel rating, or deflection limits in design, not in the field. APA’s span guidance and TPI 1 criteria are the levers to use, not guesswork.
Quick checklist
- Target spacing chosen and written on plans.
- Panel span rating on the stamp supports that spacing.
- Truss design criteria set with serviceability limits in TPI 1.
- The nailing pattern and edge support matched the panel rating.
- Notes were updated on the layout sheet so the crew could not guess.
What to Do
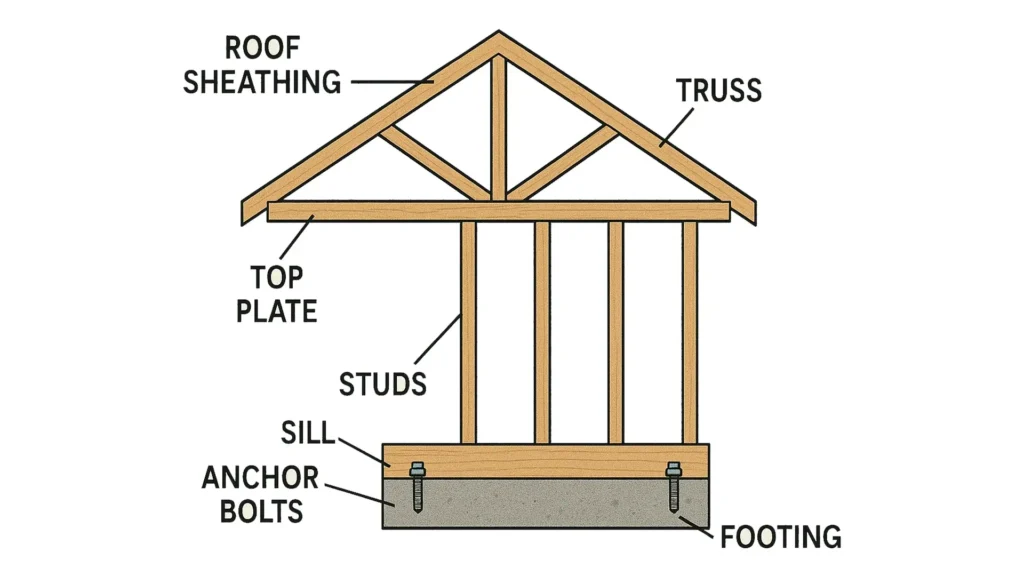
Trace every force from the roof to the foundation. Specify each link: roof sheathing to framing, roof to wall, story to story, and wall to foundation. This is the continuous load path. See FEMA P-499 fact sheets and the Building America load path guide.
Why does this matter? Gaps in the chain show up as uplift failures, racked walls, or cracked finishes. FEMA and the DOE Building America guides both emphasize that a connected path from roof to foundation is the backbone of resilient homes.
Walk the loads: Stand on the plan and point to each connection in order. If you cannot name the connector or fastener at a link, neither can the inspector.
Quick checklist
- Roof sheathing to framing nailing pattern set on drawings.
- Roof-to-wall ties sized for design uplift are shown at each bearing line.
- Upper wall to lower wall strapping or sheathing continuity is detailed.
- Wall-to-foundation anchors and plate washers are called out with spacing.
- Reaction forces from girder or hip trusses are shown with bearing notes.
Ventilation and Insulation at the Eaves
What to Do
Keep full insulation depth over the top plate and a clear air channel from soffit to ridge. Install rafter vents in each bay and add baffles or dams so insulation does not block airflow at the eave. ENERGY STAR shows rafter vents keep soffits clear and guide air up the roof deck.
Why is this important? Good eave detailing stops wind washing, keeps your target R value at the edge, and prevents cold spots that crack paint and drywall. The Building America guide recommends raised heels or oversized eaves and baffles in every bay to maintain insulation thickness and airflow.
Win: If you are aiming for a higher attic R-value, set the heel height so the insulation stays full depth at the eave. That simple move improves comfort and reduces ice and moisture issues.
Quick checklist
- Rafter vents are stapled to the roof deck in every rafter bay.
- Baffles or soffit dams are installed so insulation cannot fall into the vent path.
- Heel height is sized to keep full insulation depth over the top plate.
- Vent areas are balanced per local code, so intake and exhaust work together.
Connections and Permanent Bracing
What to Do
Specify roof-to-wall ties, hold-downs, and permanent bracing on the drawings. Follow industry bracing guides (BCSI) for metal plate-connected wood trusses and call out where top chord, bottom chord, and web bracing are required. For uplift and coastal wind, include rated roof-to-wall connectors and show spacing on the plans.
Why does this matter? Bracing keeps slender truss members from buckling, and connectors keep the roof tied to the walls during wind events. Missing either one can lead to field fixes, failed inspections, or roof loss in a storm. FEMA’s coastal guide and the BCSI B3 bracing sheets are the go-to references your reviewer expects.
Inspector tip: List the exact connector model numbers and nail counts on the schedule, not just “hurricane tie.” It speeds review and prevents crew guesswork. BCSI and the TPI standard explain how permanent restraint and diagonal bracing work together.
Quick checklist
- Roof-to-wall connector type and spacing are shown at every bearing line.
- Permanent bracing was noted for the top chord, bottom chord, and webs per BCSI.
- Diagonal bracing paths are drawn so that restraint forces can be resolved.
- Uplift reactions from the truss engineer matched to the connector capacity.
- The hardware schedule lists the model, fasteners, and corrosion protection where needed.
Coordinate MEP and Chases
What to Do
Sit with your HVAC, plumbing, and electrical plans before the truss drawings are stamped. Mark large ducts, bath fans, kitchen exhausts, recessed lights, and any future runs. If a chase is needed, ask the truss designer to build it into the layout or provide a dedicated mechanical truss.
Why does this matter? Surprise openings lead to field cuts, and cutting a truss voids the design. Planning routes early keeps structure, airflow, and ceiling finishes safe while speeding installation.
Do not cut: Never drill, notch, or remove any truss member in the field. If the route will not fit, request a revised truss or an alternate path from the designer.
Quick checklist
- MEP drawings were reviewed using the truss layout before approval.
- Duct and fan routes marked with sizes and clearances.
- Preplanned chases or mechanical trusses are shown on the shop drawings.
- Locations for can lights and junction boxes are coordinated to avoid truss webs and plates.
- Notes were added to the plans stating that no field cuts are allowed without the engineer’s approval.
Review Shop Drawings With Intent
What to Do
Open the truss design drawings and the truss placement diagram, and compare them to your roof plan line by line. Verify spans, pitch, bearing points, reactions, connector notes, and permanent bracing instructions before you sign off. Industry guidance calls out reviewing both the design drawings and the placement diagram prior to handling or installing trusses.
Why is this necessary? Catching a mismatch on paper is faster than fixing it at the crane. The BCSI guide shows that job site issues drop when the team reviews drawings and bracing sheets in advance.
Sign off list
- Truss IDs match the layout and count on your plan.
- Spans, pitch, and bearing points match the architectural roof plan.
- Reaction forces are noted at each bearing so connectors and anchors can be sized.
- Permanent bracing is called out for the top chord, bottom chord, and webs per the bracing sheets.
- Special trusses marked, like girders, hips, or mechanical chases, with location and quantity.
- Any field splices, piggybacks, or handling notes should be highlighted for the crew.
Delivery, Storage, and Handling Plan
What to Do
Set a clear landing zone before the truck arrives. Crib bundles off the ground. Cover the top but leave the sides open for airflow. Use the truss supplier lift points and rigging plan. Keep the crew off the top chords and use fall protection during staging and installation.
Why important? Good handling prevents plate damage, member cracks, and rollovers. Safe access and clear lift paths reduce fall risk and near misses.
The BCSI B1 sheets are the standard job site reference for unloading, storing, lifting, and restraining trusses. OSHA fall protection guidance applies during staging and installation.
Safety first: Confirm the crane or lift is rated for the pick and that the load chart is on site.
Quick checklist
- Staging area marked, level, and clear of overhead lines.
- Bundles cribbed off grade and protected from standing water.
- The lifting plan is set with designated pick points and tag lines.
- Temporary ground bracing is ready before the first truss goes up.
- The crew uses fall protection during staging and installation.
- BCSI bracing sheets and truss layout are posted where the crew can see them.
What to do
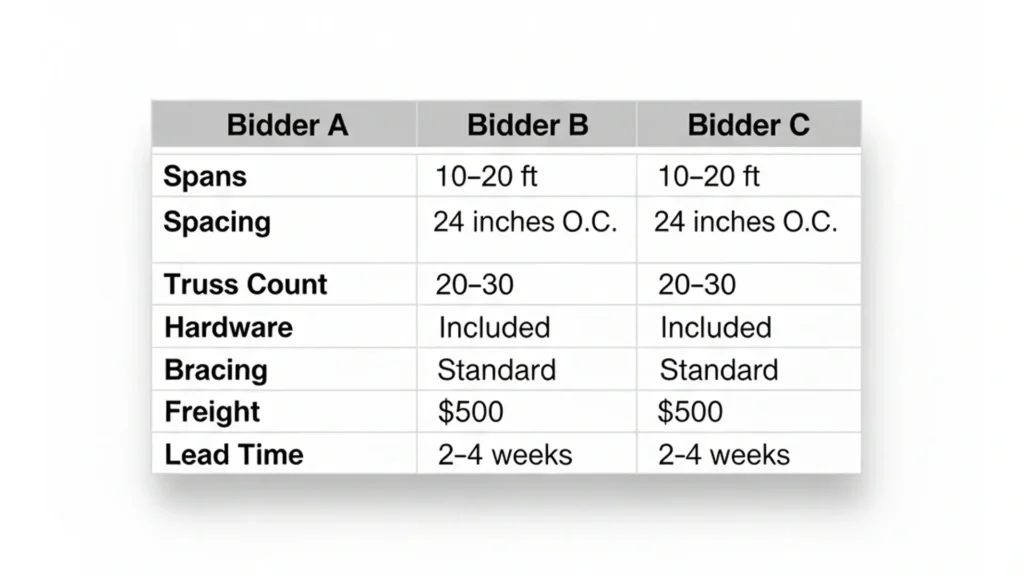
Ask each supplier for a written breakdown. Include span, spacing, truss count, plate sizes, bracing, connectors, coatings if steel, freight, crane time if bundled, and any shop drawing or engineering fees. Request the same scope from every bidder so you can compare fairly.
Why needed? A single lump sum hides trade-offs. Itemized quotes show where money moves and help you choose the mix of spacing, plates, and hardware that fits your budget without risking performance.
Quote smarter: If two bids are close, ask each supplier for one value option and one performance option. You will see how a small change in spacing or plate size shifts cost and stiffness.
Quick checklist
- Written scope matches your plans and code notes.
- Line items for truss types, count, and spans.
- Hardware and bracing are listed with model numbers and fasteners.
- Freight and lift costs are shown, along with lead time and delivery window.
- Any coatings, treatments, or special inspections noted.
- Warranty and support contacts included.
Final Thought
A strong roof starts with a calm plan. Follow the checklist, and you will line up codes, loads, spacing, connections, and delivery before the first pick. That removes guesswork, protects finishes, and makes inspection day simple.
Prefer an independent review? Structural Wood Corporation will check your roof plan and target spacing, highlight risks, and prepare an itemized truss package with clear drawings and hardware notes.
Ready to move from planning to building with confidence? Send your plans and a target install date, and we will take it from there.
FAQs
What is the best spacing for trusses?
Match spacing to the roof sheathing span rating on the panel stamp and your engineer’s limits. Many homes use 24 in. on center, but follow the stamp and design. See the APA note on span ratings here: APA Panel Trademark and Span Ratings.
Do I need raised heels at the eaves for full insulation?
Yes. Raised heels keep insulation at full depth and preserve airflow at the eave. Set the heel height to hit your target R value. ENERGY STAR explains rafter vents and baffles here: Installing Rafter Vents.
Can I cut or notch a truss to run a duct?
No. Do not cut or drill a truss in the field. Ask the truss designer for a chase or a revised truss. See BCSI guidance: BCSI Guide Booklet PDF.
Where do I find seismic design values for my site?
Use the USGS Design Ground Motions tool and save the results in your roof truss design checklist for plan review.
What should I review before installation day?
Compare truss design drawings with the placement diagram and post the BCSI bracing sheets for the crew. This prevents common job site delays.