Is your next project getting hit by rising material costs, packed schedules, and tougher energy targets?
Many builders and owners feel the same pressure. Budgets shift, inspections add stress, and one misstep in framing can affect the whole job.
In simple words: the roof system you choose sets the tone for speed, comfort, and long-term performance. That is why innovative roof truss designs matter in 2025.
In the next few minutes, you will see five smart options that cut waste, manage loads, and make room for clean mechanical runs. We will show where each design fits, what it solves, and the key questions to ask your engineer and supplier before you order.
Ready to pick a truss strategy that works in the real world? Let’s get into it.
What Makes A Roof Truss Design Innovative In 2025
The best innovative roof truss designs do three things at once. They carry loads efficiently, they speed up the build, and they support stronger energy performance. Use this simple checklist when you compare options.
Performance That Fits The Plan
Pick a system that matches span, slope, and roof shape without forcing site workarounds.
Why it matters: A truss that fits the geometry reduces rework, saves crane time, and ensures smooth inspections.
Friendly Paths For Mechanical And Electrical
Look for planned chases or open webs where ducts, lines, and cans can live without cutting members.
Why it helps: Clean service runs prevent field cuts that weaken the structure and stall the schedule.
Better Insulation At The Edges
Use a raised heel and tight air sealing at the eaves so the insulation remains full depth.
Bottom line: Warmer ceilings, fewer cold spots, and easier compliance with energy codes.
Smarter Materials For Weight And Stability
Engineered lumber, well-detailed connectors, and selective steel where needed can raise capacity without adding bulk.
The upside: Straighter installs, fewer callbacks for drywall cracks, and stronger spans where you need them.
Documentation That Clears The Path
Request stamped truss drawings, a bracing plan, uplift details, and connector schedules upfront.
Why builders love this: Clear submittals shorten reviews and prevent late surprises.
Builder’s checkpoint: Before you order, list the three most critical rooms or spans on the project. For each one, confirm the truss depth, service paths, and ceiling finish. If any box is blank, call your engineer or supplier now.
The Top Five Designs To Consider
You want strength, speed, and lower energy bills without drama on site. These innovative roof truss designs give you clear choices you can act on today.
Each one solves a different pain point, from long spans and clean service paths to vaulted ceilings and tougher code targets. Take a quick read and spot the one that fits your project goals.
1. Raised Heel Energy Trusses For Stronger Insulation
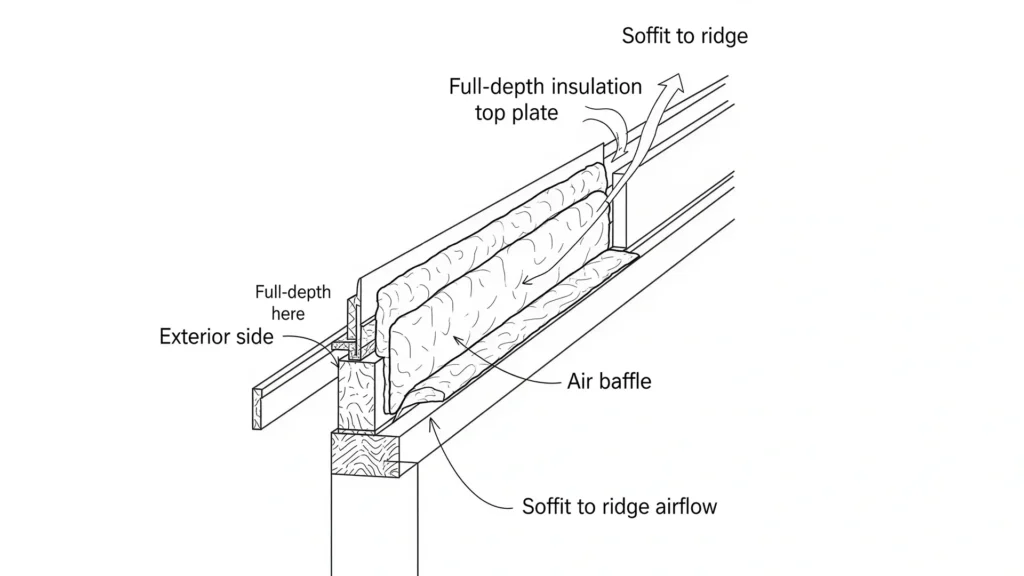
A raised heel truss lifts the top chord at the exterior wall so you can place full-depth insulation over the eaves without crushing it.
Where does it fit? New homes and light commercial, where energy targets are tight and ice dams or cold corners have been a problem.
Why builders choose it:
- Full insulation thickness at the edge of the roof.
- Cleaner air sealing at the top plate.
- Better attic ventilation layout with less guesswork.
What to ask for:
- Specify the heel height needed to keep insulation full depth at the eave.
- Call out continuous air control at the wall-to-roof transition.
- Confirm baffle locations and soffit-to-ridge airflow.
Payoff you can feel: Fewer cold spots at ceiling edges, calmer indoor temps, and an easier path to energy code compliance.
Field note: Walk the eave line before ordering. If you want the R value to stay full at the edge, your heel height must match the insulation thickness plus the ventilation space. Write that number on the plan so nobody guesses on site.
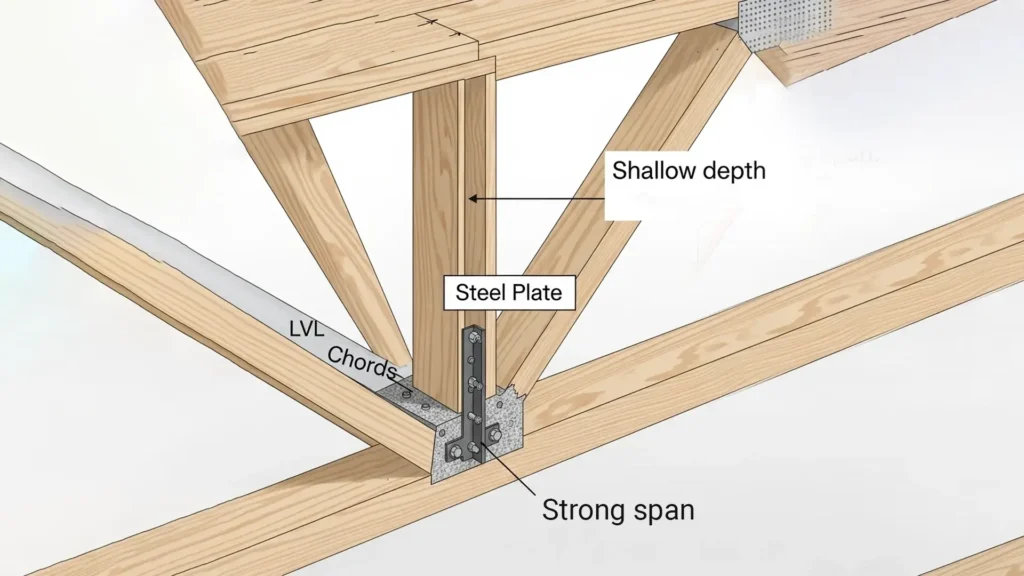
2. Mass Timber With Steel Plate Connectors For Long Spans
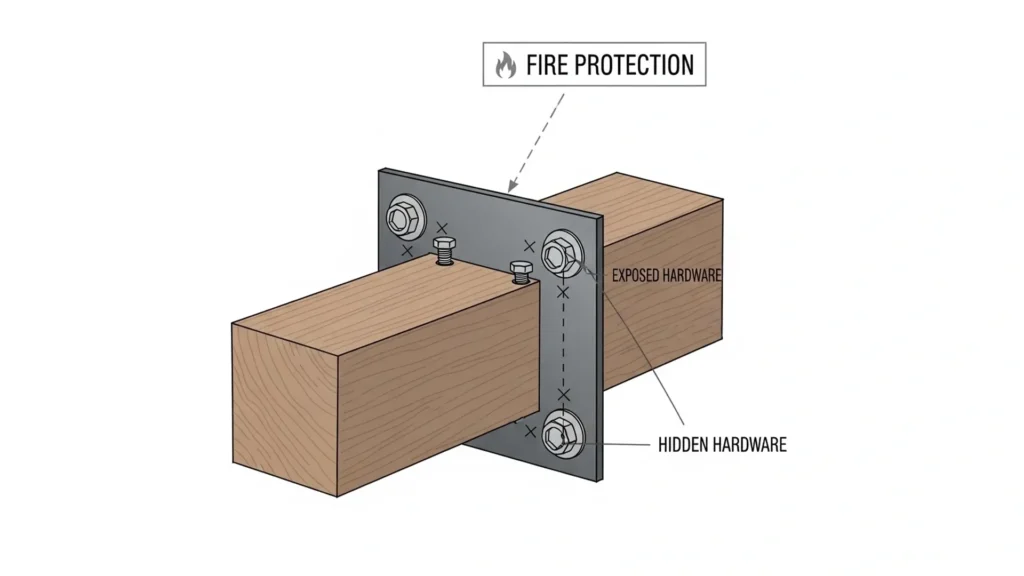
A mass timber truss uses engineered wood members with steel plate connectors at the joints. You get the warmth of wood with the capacity that steel brings to the connection.
Where does it fit? Great rooms, wide living areas, light commercial shells, and projects that want an exposed architectural look without a full steel frame.
Why builders choose it:
- Strong spans with a lighter feel than a full steel solution.
- Clean, exposed aesthetic that clients love.
- Factory-made parts that fit with less on-site fuss.
- Good coordination with concealed plates and tidy fasteners.
What to ask for:
- Connection details, including plate size, fastener schedule, and tolerances.
- Fire rating strategy, such as char design or encapsulation, where required.
- Vibration checks for long spans and lively floors below.
- Moisture protection from delivery through dry in.
Payoff you can feel: Fewer interior posts, open layouts that show off the structure, and a smoother set because parts arrive ready to assemble.
Design insight: Confirm your finish plan early. If you want exposed wood, ask the supplier to align grain, plug visible fasteners, and pre-sand members so you are not fixing finish issues on a lift.
3. Open Web Wood Trusses With Service-Friendly Paths
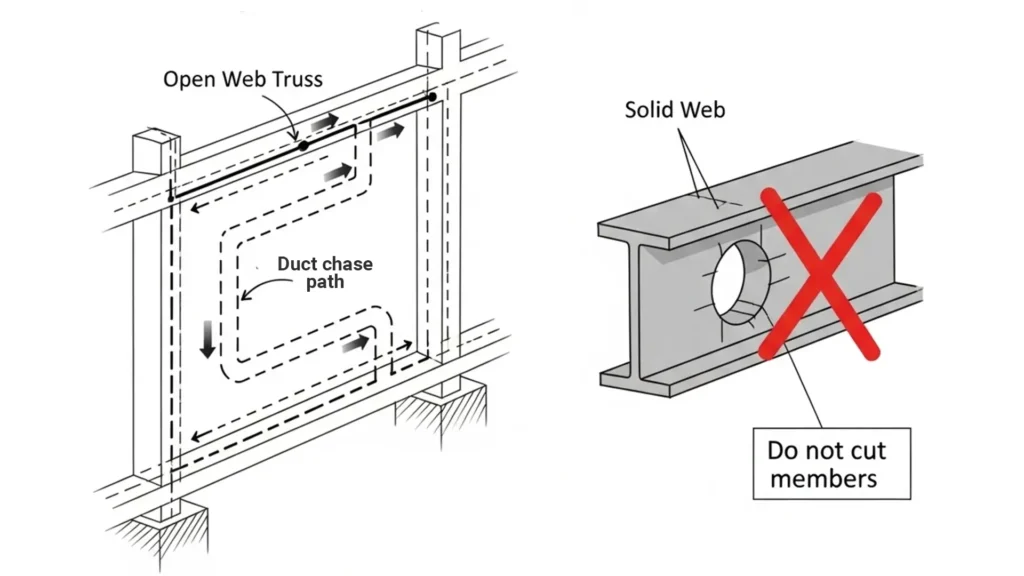
An open web truss uses diagonal and vertical members that create clear spaces inside the web. Those spaces become planned routes for ducts, lines, and cans.
Where does it fit? Single-family homes with central air, multifamily corridors, and light commercial, where you want clean ceilings without bulky soffits.
Why builders choose it:
- Faster rough-in because trades are not dodging solid webs.
- Fewer field conflicts and fewer change orders.
- Smoother inspections since service routes are planned on the drawings.
What to ask for:
- Dedicated chase size and location for main trunks and returns.
- Maximum opening sizes and keep-out zones are marked on the submittals.
- Web configuration that lines up with bathroom groups and laundry runs.
- Deflection limits that protect drywall and tile finishes.
Payoff you can feel: Cleaner ceilings, straight duct runs, less noise from kinks, and a shorter MEP schedule.
Coordination huddle: Before you release fabrication, hold a quick meeting with mechanical, electrical, plumbing, and the truss supplier. Walk the plan and mark every major run. If a chase looks tight, fix it now while changes are still cheap.
4. Scissor Trusses For Airy Interiors Without Heavy Beams
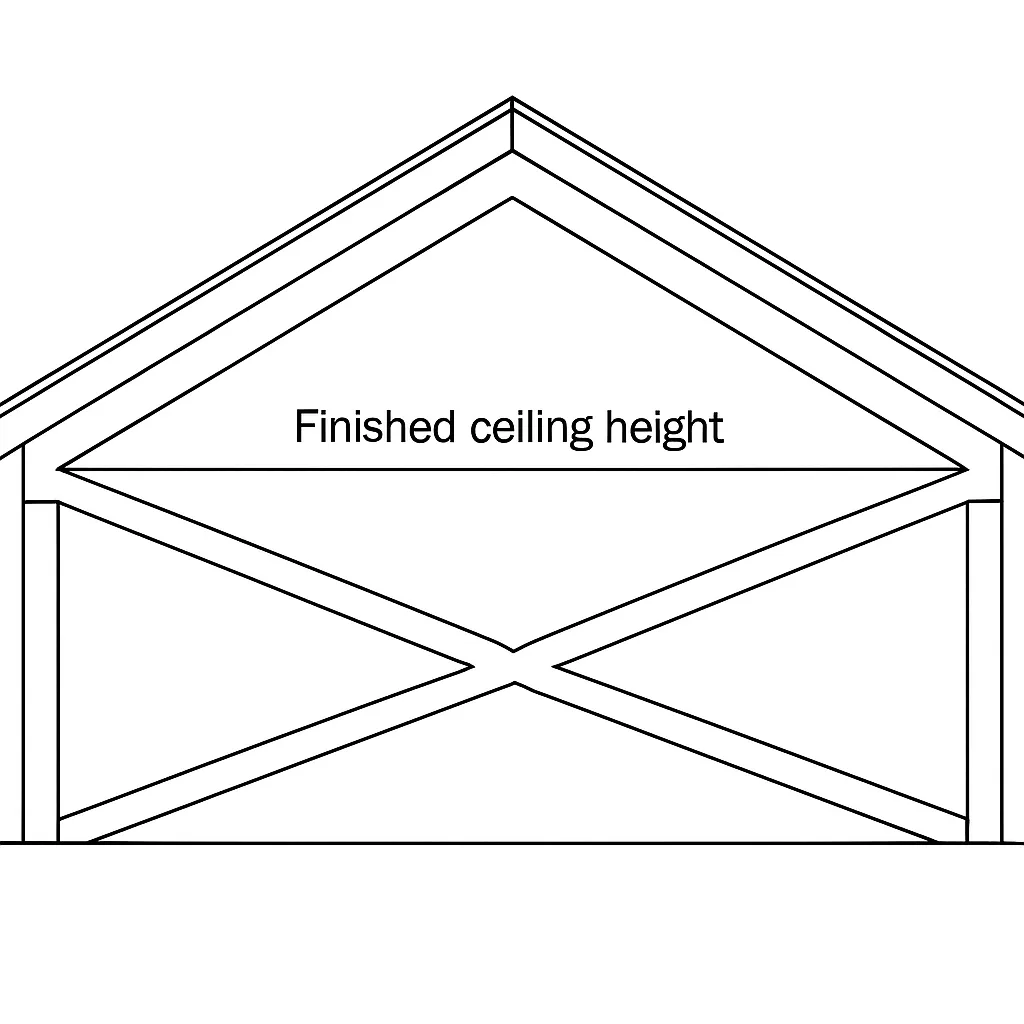
A scissor truss uses two sloped bottom chords that cross, creating a vaulted ceiling while the top chords carry roof loads.
Where does it fit? Living rooms, great rooms, and entries where you want height and a clean vaulted look without a steel frame.
Why builders choose it:
- Creates volume and daylight with a simple repeatable truss pattern.
- Controls horizontal thrust better than rafter pairs with raised ties.
- Works with common roof pitches and standard bearings.
What to ask for:
- Target ceiling pitch and finished height at midspan.
- Deflection limits that protect drywall joints at the vault apex.
- Uplift, bracing, and connector details for the thrust line.
- MEP plan for lighting boxes and fans at the peak.
Payoff you can feel: An open, airy room that installs fast, looks custom, and avoids the cost and complexity of large exposed beams.
Finish check: If you plan a smooth drywall ceiling, ask your engineer to hold tighter deflection limits and specify back blocking at the ridge line. Small movements at the apex are the ones most people notice.
5. Prefabricated Modular Truss Panels For Faster Set
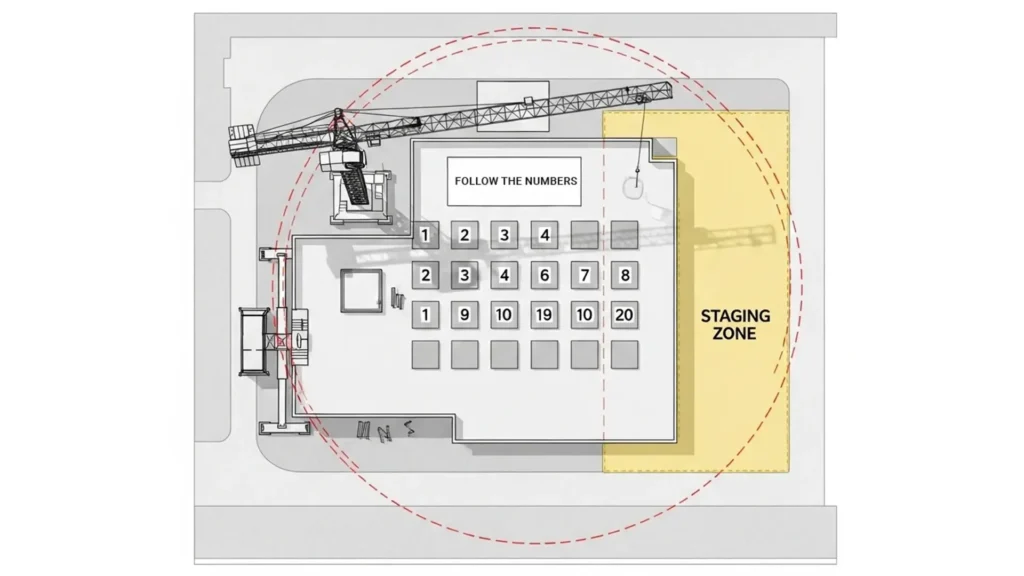
Factory-built truss panels arrive in numbered modules. They can be pre-braced and pre-sheathed so crews can lift, place, and tie them together quickly.
Where does it fit? Tight urban lots, repeat bay projects, multifamily corridors, hotels, and any job that needs a predictable set with less on-roof time.
Why builders choose it:
- Fewer picks and faster dry-in.
- Safer handling since panels stay stable during lifts.
- Clean geometry that reduces layout errors.
What to ask for:
- Panel sizes that match the crane reach and the staging area.
- Whether sheathing and underlayment are done in the plant or on-site.
- A bracing and tie-in plan for ridges, hips, and valleys.
- Bearing line tolerances and how panels align at party walls.
- Weather and transport protection to keep panels dry.
Payoff you can feel: Days saved on the schedule, fewer fall risks, and a tidy set that helps the next trades start sooner.
Logistics checklist: Confirm delivery sequence, crane path, ground bearing capacity, and a clear staging pad. Mark panel numbers on the deck layout so the crew can follow the order without guesswork.
Choose The Right Truss Materials For Your Build
This is where most innovative roof truss designs either save you or surprise you. Your pick changes span capacity, crew speed, energy performance, and lead time.
Timber gives a warm look and quick cuts on-site. Steel delivers slim members and big strength for wide rooms.
Many smart projects blend both with steel plates at the joints or a few strategic steel members. Next, we will show when to choose timber vs steel and which lightweight options raise strength without extra bulk.
Timber Vs Steel Trusses
Here is a quick side-by-side to help you choose. If your goal is warmth and easy field fixes, timber often wins. If you need very wide rooms with slim profiles, steel usually takes the lead.
| Criteria | Timber trusses | Steel trusses |
| Span | Good for small to medium. Long spans with engineered lumber. | Best for very long, clear spans. |
| Profile depth | Deeper at long spans. | Slimmer profiles are possible. |
| Thermal | Fewer cold bridges. | Needs thermal breaks at joints. |
| Lead time | Often faster with local supply. | Can run longer due to fabrication and coatings. |
| On-site changes | Easier to trim and fix. | Avoid field changes. Lock details early. |
| Look | Warm natural finish. | Clean modern lines. |
Quick tip: Ask for two matched quotes on the same loads and spans. Let today’s lead times and crane costs pick the winner.
At a glance: pick timber when you want fast cuts, a warmer look, and better thermal behavior. Choose steel when you need slim members, very wide rooms, or long clear spans. Many innovative roof truss designs mix both to get strength where it counts and a clean finish.
Need help choosing timber or steel for your project? See our Roof Truss Design Guide for use cases and to request a review.
Lightweight Members And Composite Ideas
Use engineered lumber like LVL or LSL, laminated members, and select steel at high-stress joints. You get strength to weight that keeps profiles slim and installs straighter.
Where does it fit? Longer rooms that need shallow depth, retrofits where ceiling height is tight, and projects that want clean lines without bulky beams.
Why builders choose it:
- Straighter members reduce shim work and drywall touch-ups.
- Higher capacity without a big weight penalty.
- Predictable performance across changing humidity.
What to ask for:
- Member grade and design values are listed on submittals.
- Connection details for mixed materials at nodes.
- Camber or pre-crown requirements for long spans.
- Moisture limits from the factory to dry in.
Payoff you can feel: Faster installs, fewer callbacks for nail pops or cracks, and a cleaner ceiling plane that makes finish work look pro.
Design hack: If you are fighting headroom, ask for a composite option that uses engineered lumber with a slim steel plate at the joint. You can gain inches where it matters and still keep a wood finish.
Engineering And Code Items That Save You Later
Load Path And Uplift
A strong roof starts with a continuous load path from the sheathing through the trusses and down to the foundation. Use rated roof-to-wall connectors and straps at every bearing line, and size them for local wind speeds so uplift does not tear the roof free during a storm.
Never rely on toe nailing for uplift in high wind regions. FEMA’s coastal guide shows correct connector types and why the load path matters.
Bracing That Matches The Truss Plan
Every truss package must come with a bracing layout that covers both temporary bracing during the set and permanent bracing for the life of the building. Place lateral and diagonal braces exactly where the design shows and tie them into solid anchors so the roof cannot rack under construction loads or wind.
If the job is in a high wind area, confirm the bracing plan reflects those higher demands before you release fabrication. FEMA’s roof system fact sheets explain how improved connections and added restraints reduce damage in wind events.
Sheathing And Diaphragm Details
Follow the nailing schedule on the drawings and use ring shank nails or screws where required. Close up edge spacing at ridges, hips, and eaves when the design calls for it, and do not use staples in high wind areas.
Stronger roof diaphragms improve the way the building shares wind and seismic loads, and the International Residential Code points to approved sheathing practices for those systems.
For a deeper study of diaphragm behavior and deflection, the Forest Products Laboratory provides engineering references you can share with your building official.
Submittals That Clear Quickly
Ask the supplier for stamped truss drawings, a connector schedule, uplift reactions at each bearing, bracing notes, and a shop drawing review timeline. Add your roof sheathing nailing schedule and the mechanical layout so the reviewer sees the whole plan.
The FEMA compilation of the residential code highlights how roofing sections reference approved sheathing and connection details, which makes your submittal easier to approve.
Mep Coordination Inside The Math
Mark, keep out zones on the structural sheets and give the mechanical contractor dedicated chases so nobody needs to cut web members. At the eaves, plan for full-depth insulation with baffles that keep soffit air moving and prevent wind washing.
On-Site Protection That Keeps Members Straight
Set up a dry staging area and sticker bundles to allow air flow, and keep covers on until the crew is ready to set. Moisture management before dry in reduces swelling, cupping, and future drywall cracks.
For mass timber or engineered lumber, follow the manufacturer’s moisture limits from delivery through enclosure and log readings if the project requires it. The Forest Products Laboratory’s handbook is a reliable reference on how moisture affects wood performance and why controlled storage matters.
Permit-friendly checklist: Before you order, send one email with the architectural set, the truss submittals, your roof nailing schedule, and the MEP layout. Ask the engineer and supplier to confirm bracing, uplift reactions, and diaphragm assumptions in writing.
Cost And Schedule Signals To Watch
Budgets rarely explode from one big mistake. They leak time and money through small delays and avoidable changes. Read these signals early so you protect your crane day, lock your price with confidence, and get the roof dried in on time.
- Lead times and plant capacity: Ask your supplier for current production slots before you lock your start date. Truss plants book out fast when demand spikes. A two-week slip on fabrication can ripple through roofing, mechanical rough-in, and inspections.
- Material price swings: Plan for allowance language in your contract. Softwood lumber and steel products move month to month, which can change the best value choice for your design.
- Crane time and access: Your crane plan is not just a lift schedule. It is a cost control tool. Confirm ground bearing capacity, swing radius, panel weights, and the longest lift in advance. Follow OSHA rules for crane operation and do not proceed if the pick approaches the rated capacity at the planned radius.
- Weather windows and dry in: If rain is likely, stage tarps, stickers for airflow, and a clear path to dry storage. Keeping members straight and dry protects finish quality and avoids rework later.
- Change tolerance: Prefabricated trusses deliver speed, but they lock dimensions early. Freeze roof openings and service chases before you release fabrication, so you are not paying for rush revisions.
- Inspection sequence: Bundle stamped truss drawings, uplift reactions, bracing notes, and your roof nailing schedule in one submittal. Faster approvals reduce idle days and help you hold the crane date.
Scheduler note: Build a simple three-line calendar for the roof. Line one is fabrication and delivery. Line two is crane day and set. Line three is sheathing, dry-in, and inspection. Share it with your truss plant, crane company, and inspector so everyone is aiming at the same window.
Conclusion
The right truss choice sets the tone for the whole build. Pick a design that carries the load cleanly, gives room for services, and keeps insulation full at the edges. You get faster sets, calmer inspections, and lower energy bills without surprises on-site.
If you want a quick sanity check before you order, Structural Wood Corporation can help. Send your plans, and we will review spans, bracing notes, and service paths and point you to the design that fits your goals.
Ready to move forward now? Ask for a fast quote and a stamped submittal package so you can lock your schedule with confidence.
FAQs
Do innovative roof truss designs cost more?
Sometimes. Materials can be higher, but faster installs and fewer fixes often balance it out. Ask for side-by-side quotes before you buy.
Which designs help most with energy savings?
Raised heel energy trusses. They keep insulation full at the eaves and reduce cold spots, which boosts comfort and lowers bills.
Are prefabricated truss panels strong enough for snow and wind loads?
Yes, when engineered for your local loads and installed exactly as specified. Follow the stamped drawings and connector schedule.
When should I choose timber vs steel trusses?
Pick timber for a warmer look, easy field work, and better thermal behavior. Choose steel for long spans, slim profiles, or heavier loads. Many projects use a hybrid.
Can I customize innovative roof truss designs for a unique roofline?
Yes. Share roof shape and service chases early, and never cut members in the field. Follow the engineered bracing and connection details.