Are roof bids still going up even after you tried to cut costs?
If the roof is where your budget keeps leaking, your commercial roof truss choices might be the real reason.
You are not alone. Contractors and owners deal with tight schedules, rising material prices, and code reviews that slow the job. It is stressful to watch cost lines climb while the drawings barely change.
Here is the simple truth: You save more by choosing the right design and build plan than by chasing the lowest unit price. Small choices on spacing, shape, and materials can cut lift time, reduce waste, and make inspections easier.
In this guide, you will get clear, practical ideas you can take straight to your truss supplier and GC. We will cover smart material choices and whether prefab or site-built fits your job.
Then we will look at span and spacing tweaks, load planning, install steps that reduce rework, energy upgrades that pay back, and the checks that keep permits moving.
Ready to see where the real savings are? Let us get into it.
Where the Money Goes in a Roof Truss Package
Before selecting a truss, map out the costs. Most budget creep originates from three primary sources: materials, labor, and lifts, as well as small design choices that impact the quantity of pieces purchased and the rate of installation.
Material Mix and Plate Specs
The wood species, grade, and connector plates set a big part of the price. Higher-grade lumber can mean straighter pieces and less waste. Engineered wood, like LVL or glulam, can span farther with fewer members. In wet or coastal projects, coatings and stainless hardware may save you from early repairs.
Cost impact: Pay for strength where it matters, not everywhere.
Quick check:
- Ask every bidder for two material alternates.
- Compare plate sizes and counts, not only board feet.
Labor, Staging, and Crane Time
How fast you can lift, set, and brace often beats small savings on wood. Plan a clear laydown path. Tag every bundle. Lock the crane windows so the crew is never waiting. Set a target for trusses per hour and staff to meet it.
What to avoid: Trusses arriving with no bracing plan or blocked access. That slows the team and drives up hours.
Crew planner:
- Who receives and checks bundles?
- Who rigs, who sets, and who braces?
- Who signs off on each bay before moving on?
Design Choices That Change Count and Span
Small moves change how many trusses you buy and how long the installation takes. A modest spacing tweak can cut the total count without hurting stiffness. A raised heel keeps full insulation at the edge and can lower energy bills. Simple, repeated web patterns speed shop work and field installs.
Quick win: Standardize to one or two truss types across the job. Fewer unique parts usually mean faster work and fewer errors.
Budget check:
- Price the base design and one simplified option side by side.
- Add crane hours and crew hours to every comparison.
- Include bracing, blocking, and connectors in the total, not only lumber.
Cost map: Make a one-page summary that shows your estimated split for materials, labor, lifts, and extras. Update it after the first bay is set. This keeps the team focused on the biggest levers.
Choose Materials That Balance Price and Life
Picking the right wood and connectors does more than trim the bid. It keeps your commercial roof truss straight, strong, and easy to maintain.
Start With The Species
- Douglas fir, southern pine, and spruce are the common choices.
- Douglas fir is strong and stable, which is good when you want fewer members.
- Southern pine is dense and grips plates well, which can reduce slip.
- Spruce is lighter and often cheaper, fine for shorter spans and mild climates.
Design takeaway: Match species to span, moisture, and supply in your region. Pay for strength where it helps the most.
When to Step Up to Engineered Wood
LVL and glulam are ideal for long spans, high loads, or where straightness is critical. You may buy fewer trusses and speed up the set because members stay true.
Cost impact: Engineered wood costs more per stick but can cut total pieces, plate counts, and install time.
Treatments and Connectors for Tough Environments
In kitchens, pools, or coastal projects, look at fire-treated lumber, corrosion-resistant plates, and stainless fasteners near vents and penetrations. Moisture and chemicals shorten the life of untreated parts.
Field note: If the roof sees regular washdowns or steam, confirm connector coatings with your supplier.
Grades, Plates, and Deflection Limits
A higher grade can reduce waste and callbacks. Plate size and layout matter just as much as board feet. Also, set a clear deflection limit so the roof feels solid and looks flat.
Design takeaway: Ask your truss engineer to show how grade and plate changes affect count, weight, and camber.
Quick Comparison You Can Run With Your Supplier
| Step | Ask Your Supplier | Compare or Include | Why It Helps |
| 1 | Price the same layout in Douglas fir and southern pine. | Species cost, lead time, plate grip. | Finds the best value for your spans and climate. |
| 2 | Add one alternate with LVL top chords for the longest spans. | Piece count, crane time, plate sizes. | Fewer members and a faster set can offset higher stick cost. |
| 3 | Review plate sizes and counts. | Plate layout, press time, waste. | Smaller or fewer plates can lower shop time and total cost. |
| 4 | Confirm any needed treatments or coatings early. | Fire treatment, corrosion resistance, stainless fasteners. | Prevents reorders and delays on wet or coastal projects. |
Money saver: A slightly thicker chord can allow for smaller or fewer plates. The material adds a little, but the plate savings and faster pressing can beat it on total cost.
Prefabricated Trusses or Site-Built Frames

For a commercial roof truss package, the build path shapes cost and schedule. Prefab often moves faster with fewer errors. Site-built can fit tight access or special shapes when a truck cannot bring full trusses to the deck.
When Does Prefab Win?
Factory-made trusses come with steady quality and predictable setup. Crews lift, place, and brace in a clean sequence. Weather delays drop because most work happens under a roof at the plant. Inspections go smoother since shop drawings match what shows up on site.
Bottom line: Prefab saves time when you have room to stage bundles, a crane plan, and steady delivery slots.
When Site-Built Framing Makes Sense
Some jobs have no clear path for long loads or have many small rooms with tight angles. On very small projects, the setup for prefab may not pay off. A skilled crew can frame on-site with short stock and still meet the design.
Design takeaway: Choose site-built if access is tight, spans are short, or the profile is unique and likely to change.
Logistics That Make or Break the Plan
Whatever path you pick, plan the flow early. Reserve crane time that matches the heaviest lift. Mark a laydown area close to the set line.
Tag every bundle or stack so the crew can grab the right piece without hunting. Confirm who checks plates, who rigs, who sets, and who braces each bay before the next lift.
Schedule booster: Ask your supplier for a load-by-load delivery plan. One mixed truck per day can keep the crew moving and reduce idle crane time.
What to avoid: Full trucks with no place to stage, or a crew waiting on a late delivery. Both burn money fast.
Span, Spacing, and Profile Choices That Cut Cost
Small design moves can lower total pieces, crane time, and callbacks. The right mix here often saves more than a small discount on materials.
Tune the Spacing
Wider spacing means fewer trusses, but only if stiffness and deck specs still pass. Closer spacing can simplify connectors and make lifting easier. Run both options with your truss engineer and compare the full install time, not just the lumber count.
Cost note: Ask for an alternate that keeps the same span with one-click wider spacing. Price the difference with crane hours included.
Choose a Simple Profile When You Can
Straight runs and clean lines set faster than complex hips and valleys. Repeating the same profile across bays helps the shop and the field. Fewer unique pieces usually means fewer mistakes.
Quick win: Standardize to one or two truss types across the job. Keep the odd shapes to the spots that truly need them.
Use a Raised Heel for Full Insulation
At the eave, insulation often gets pinched. A raised heel keeps the full R-value all the way to the edge. That protects the envelope and can lower energy bills without much added cost.
Design tip: Pair the raised heel with a clear vent path and baffles so airflow stays open.
Keep Web Patterns Repeatable
Simple, repeatable web layouts press faster in the plant and are easier to inspect on-site. That consistency also makes future repairs or swaps more predictable.
Field note: Ask the supplier to show plate counts and press time for the chosen web pattern. Sometimes a small change cuts both.
Check Deflection and Vibration Early
Set a clear limit for deflection so the roof looks flat and feels solid. A little extra depth in the chord or a stiffer web can solve bounce before it becomes a punch list item.
Code check: Confirm spacing, spans, and deflection limits with your truss engineer and local code office. Make sure the calc package and shop drawings line up with the chosen profile.
Plan Roof Load Capacity Early
Load planning is where many budgets slip. If you size the commercial roof truss for real-world loads from day one, you avoid redesigns, delays, and change orders.
Start by listing every load you expect on the roof. That includes snow and wind for your location, plus the heavy gear the owner wants now or later.
Know What’s Happening on the Roof
Rooftop units, ducts, cable trays, solar racks, skylights, and guardrails all add weight. So do access paths for maintenance. Put rough weights and footprints in a simple table. Share it with your truss engineer and the MEP team.
Design takeaway: Place heavy items over walls or beams when you can. Shorter load paths mean smaller members and fewer surprises.
Map the Load Paths
Truss to deck. Deck to chords and webs. Chords to bearings. Bearings to walls and frames. A quick sketch of this path helps catch weak links before they become field fixes.
Field note: Keep penetrations and big openings out of high-load zones. If you cannot, plan headers or double members in the shop drawings.
Check Drift, Uplift, and Service Loads
Snow does not sit the same on every roof. Parapets and step-downs can cause drift. Wind can pull as well as push. Maintenance crews add moving loads when they carry parts or carts.
Code check: Align your design with local code for snow, wind, and seismic where it applies. Make sure the calc package shows the values you used and the zones you applied.
Coordinate With MEP and Solar Early
A small shift in unit location can save a lot of steel and wood. Ask the MEP lead to lock equipment weights and base sizes before truss finalization. If solar is planned, reserve attachment zones and show them on the drawings.
Quick win: Add a thirty-minute load review to the design kickoff with your truss engineer, structural lead, and MEP. One short meeting can prevent weeks of back and forth later.
What to Document for Fast Approvals
- A one-page load schedule by zone
- Locations and weights for rooftop units and panels
- Notes on drift, uplift, and any special anchors
- Contact names for the structural and MEP leads
Installation Techniques That Reduce Rework
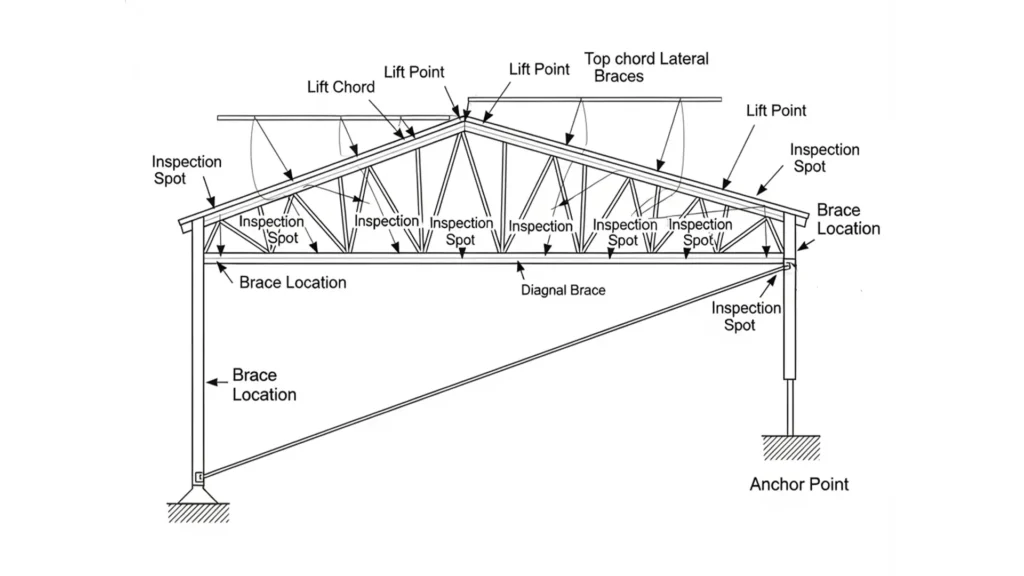
Good installs save more money than small cuts in materials. A clean plan keeps your commercial roof truss set smooth, safe, and fast.
Safety note: OSHA requires fall protection in construction under 29 CFR 1926 Subpart M when work is six feet or more above lower levels. Use guardrails or a personal fall arrest system at roof edges and openings, and keep a clear rescue path.
Step 1: Plan the Set Day
Walk the roofline before the first lift. Clear a laydown area close to the work. Mark the crane path. Confirm radios and hand signals. Set a simple target for trusses per hour so the crew knows the pace.
Field lesson: Ten quiet minutes before the first lift can save an hour later.
Step 2: Label and Tag Everything
Ask the supplier to tag each bundle and each truss. Use large letters that match the shop drawings. Keep the set sequence printed at the laydown area.
Quick win: Color tape by bay or zone so the rigger grabs the right piece fast.
Step 3: Install Temporary Bracing Early
As soon as the first run is set, add top chord lateral bracing and one diagonal brace tied to a solid anchor. Keep the bays square with a chalk line or measuring sticks. Do not remove any brace until permanent bracing is in.
What to avoid: Setting a long run without a bracing plan. Wind and bumps can rack the line and force a reset.
Step 4: Follow a Simple Lift Sequence
Rig. Lift. Set on the marks. Tack fasteners. Brace. Then move. One person calls the steps and signs off the bay before the next swing.
Step 5: Assign Clear Roles
One receiver checks plates and bearings. One rigger runs slings. Two setters guide chords onto bearings. One bracer locks the bay. Clear roles keep people moving without crowding the work.
Step 6: Check Fasteners and Plate Seating
Verify bearing length and plate seating on every truss. Use the right nails or screws at the correct spacing. If a plate sits proud, stop and press or replace it.
Cost impact: Five minutes now can prevent leaks, squeaks, and ceiling cracks later.
Step 7: Watch the Weather
Set a wind cutoff. Cover bundles if rain is coming. Keep walk paths dry and clear. Wet work slows the pace and raises risk.
Safety note: Use fall protection at edges and near openings. Keep a clear rescue path.
Step 8: Schedule Three Quick Inspections
Check after the first five trusses for bearing and bracing. Check at the end of the first bay for square and spacing. Check before final bracing for fasteners and plate seating. Log the checks with initials and time.
Step 9: Share the Sign-off
Give the checklist to the GC and the inspector. It builds trust and speeds approvals.
Build Energy Efficiency Into the Truss Package
Energy savings start with the truss design. A raised heel keeps full insulation at the eave, so you keep the R-value you paid for. Pair it with clear vent paths and baffles so air moves from the soffit to the ridge without hitting a blockage.
Seal every roof opening. Flash curbs and pipes so water stays out and air leaks stay low. Place ducts and big units so they do not crush insulation or block vents.
Pick materials that help the building run cooler. Light-colored roofs reflect more sun. A stable deck and straight chords keep the roof flat, so the membrane lasts longer.
Power saver: Ask your truss engineer to show the R value you keep at the edge with and without a raised heel. The numbers make the choice easy.
Maintenance and Service Access From Day One
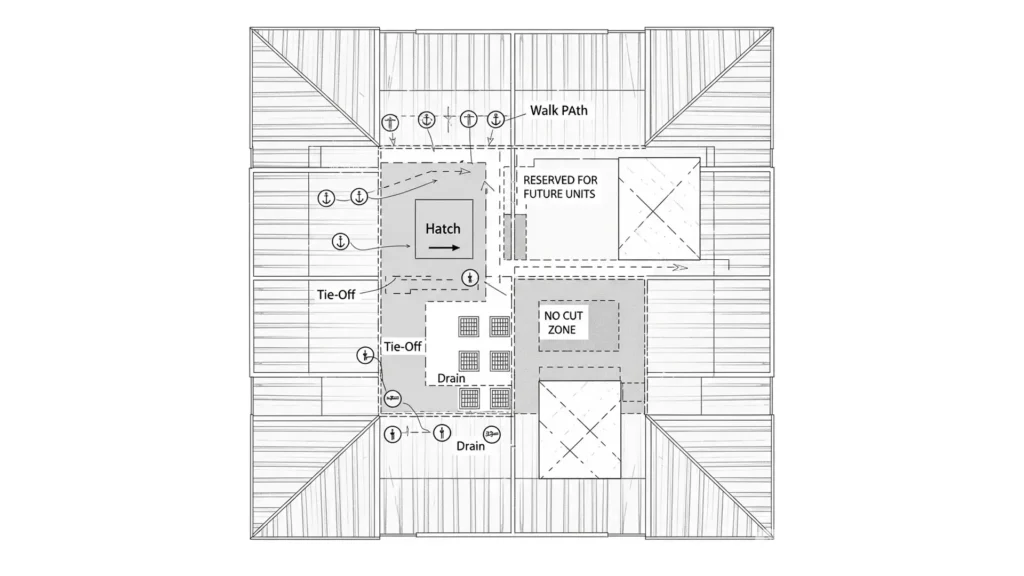
Plan for upkeep now so your commercial roof truss lasts longer and costs less to own.
- Safe and simple access: Show the roof hatch or ladder on the drawings. Keep a clear space around it. Add guardrails or tie-off points at edges and near openings so crews can work safely.
- Walk paths that carry the load: Use catwalks or pads that keep weight off the insulation. Set them on sleepers and rate them for the live loads you expect from carts and parts.
- Keep water moving: Slope the roof to drains. Add crickets behind rooftop units. Keep scuppers and gutters clear in the plan and in the maintenance notes.
- Protect the structure: Mark no-cut zones so future trades do not drill through chords or webs. Call out firestopping at penetrations. In humid spaces, include a vapor barrier and venting so moisture does not sit on plates and connectors. Use corrosion-resistant hardware where chemicals or salt are present.
- Leave room for the future: Reserve zones for solar racks or new units. When possible, place them over walls or beams. Allow a little extra capacity in select trusses if future loads are likely.
- Simple inspection rhythm: Inspect after the first season, then once a year, and after any major storm. Look for plate lift, loose fasteners, soft spots, water stains, rust, and crushed insulation near edges.
Maintenance check: Keep an as-built service map on site. Mark walks paths, tie-off points, no-step areas, and reserved zones for future gear. It prevents damage and speeds repairs.
Docs to Keep On-Site:
- O and M notes with drain cleaning and fastener checks.
- Warranty terms for the roof and truss package.
- Contacts for the structural and MEP leads.
Budgeting and Bidding Without Surprises
Set up the bid the same way for every vendor so you can compare it fairly. Use one shared bid form and make sure each box is filled the same way.
Lock The Scope
Write what is included and what is not. List trusses, bracing, blocking, connectors, delivery, shop drawings, calc stamps, and field support. Say who pays for crane time and who handles laydown and cleanup.
Ask for Two or Three Alternatives
Request prices for:
- Material options by species and grade
- An engineered option, such as LVL or glulam, on long spans
- One wider spacing option with the same deflection target
- Raised heel detail
- Prefab versus site-built if access allows both
Cost check: Always add crew hours and crane hours to the price. The lowest material cost is not always the lowest total cost.
Set Schedule and Submittal Terms
Give target dates for shop drawings, calc packages, and deliveries. Tie payments to clear milestones such as approved submittals and the first bay set.
Cover Price Movement and Waste
Ask for a valid through date and how long the quoted lumber price holds. Include a small waste allowance so you are not chasing single sticks later.
Procurement tip: Send one page with the exact items and price. When every bidder fills out the same form, you can compare bids apples to apples in minutes.
Approvals and Building Code Compliance
Clean paperwork speeds permits and inspections. Build your commercial roof truss submittal so it answers questions before they are asked.
What to Include in the Submittal
- Shop drawings with truss tags that match the plans
- Truss calculations sealed by a licensed engineer
- Connector and fastener specs, bearing lengths, and permanent bracing notes
- Load summary by zone for snow, wind, equipment, and access
- Fire rating details if the roof is part of a rated assembly
Inspector tip: Put the truss calc cover sheet, load table, and bracing sheet on top. It helps reviewers find the key facts fast.
Coordinate With Your Local Code Office
Ask about local amendments to the International Building Code and any special inspection triggers. Confirm when they want to see the first bay and what photos or checklists they accept as proof.
Bracing and Diaphragm Details
Show permanent bracing on the drawings, not just temporary bracing. Include deck nailing schedules, blocking, and drag struts so the roof diaphragm can transfer loads the way the engineer intends.
Simple Inspection Plan
Plan three quick checks: after the first five trusses, at the end of the first bay, and before final bracing. Log who checked, what they saw, and the time.
Code check: Make sure shop drawings, calc values, and the site installation match. If one changes, update the others and resend the package.
Final Thought
Smart choices in design, load planning, and installation steps can lower your bid today and cut risk for years. Get the basics right, and your commercial roof truss package sets faster, passes inspections with less friction, and helps the building run cheaper.
If you want a quick double check, Structural Wood Corporation can review your drawings and share fast wins on spacing, profiles, and bracing. No pressure. Send your plan, and we will reply with short notes or a free quote so you can compare with confidence.
FAQs
What is the best commercial roof truss for large spans?
It depends on loads and access. Engineered options like LVL or glulam can keep long spans straight with fewer pieces. Confirm spans and deflection with your truss engineer.
Are prefabricated trusses cheaper for commercial work?
Often yes, because factory quality and faster set times cut rework and crane hours. A site built can still win when access is tight or shapes are unusual.
How do I plan roof load capacity the right way?
List snow, wind, and all rooftop gear, then map load paths to walls and frames. Watch for drift that creates unbalanced snow on step-downs and obstructions.
Do raised heel trusses really improve energy performance?
Yes. They allow full insulation at the eave and work best with clear vent paths and baffles to control moisture.
What safety rules apply near roof edges?
OSHA requires fall protection at six feet and higher in construction. Plan tie-off points and safe walk paths in your commercial roof truss drawings.