
Have you seen the award-winning Soho Farmhouse in Oxford shire? It uses exposed queen post trusses to span large communal dining and lounge areas. And nowadays, you can find such design ideas buzzing on Pinterest.
So, you can see that the queen post truss is quite a popular structural solution for medium-span roofs. Unlike the king post truss, which uses a single vertical post, the queen post truss features two vertical posts.
However, in this complete guide, you will get an overall idea about queen post roof trusses and how to build them. Also, we will be showcasing the span chart for the queen post roof truss.
Queen Post Truss Drawing

A queen post truss is a symmetrical truss with two vertical posts, which are the Queen post, two rafters and a diagonal strut. A queen post roof truss is called the lengthened version of the king post truss because it can span longer than the king post roof trusses.
Actually, a queen post roof truss is a structural setup that looks simple but performs a complex balancing act.
But here’s something to keep in mind: without diagonal bracing inside the rectangular frame, it’s technically not a “true” truss. It behaves more like a frame and can flex under uneven loads like wind or snow drifting on one side of the roof. That’s why designers often add internal braces or carefully align purlins with the queen posts to improve stability.
In many cases, these trusses support wide, open spaces—like attics or vaulted ceilings—where exposed timber becomes part of the architecture. But when the interior rectangle isn’t reinforced, the bottom chord (the tie beam) has to work harder, bending under the weight. This induced bending is a key reason engineers often reinforce or redesign queen post trusses for modern loads.
According to TImber Frame Engineering Council, while it’s a strong and beautiful solution, the queen post truss isn’t plug-and-play—it requires smart design choices to match the demands of today’s building.
It’s used for medium roof spans, typically between 8 and 12 meters, and is well-suited for traditional and modern buildings. However, this also makes it a smarter choice for larger rooms, vaulted ceilings, and buildings that need both beauty and strength.
Components of a Queen Post Truss
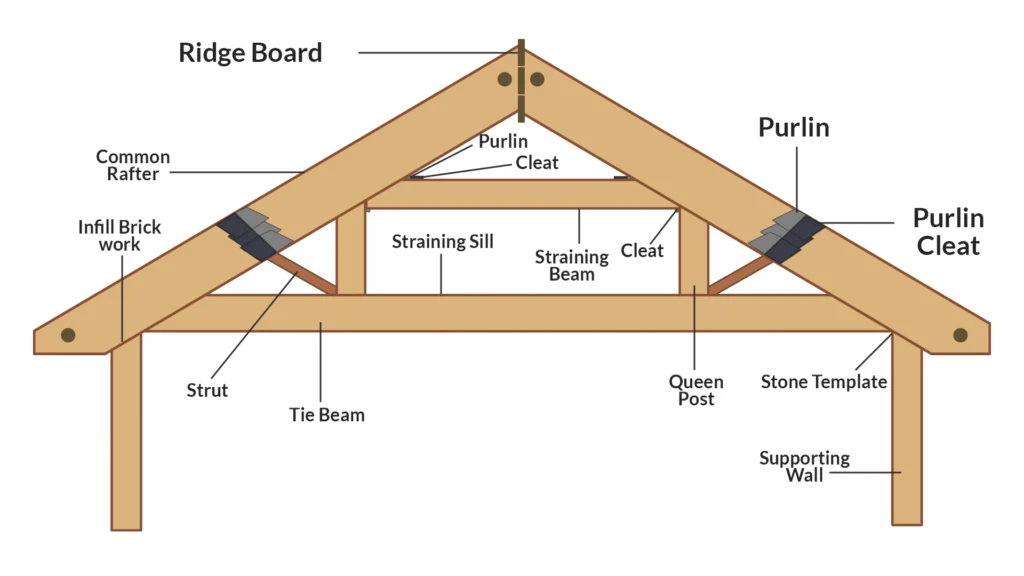
There are mainly 5 components in a queen post truss.
1. Queen Posts
The signature components of this truss—two vertical members—stand between the tie beam and straining beam. They help reduce the span of the tie beam by dividing the load and transferring it efficiently to the supports.
2. Tie Beam
A horizontal base connecting the ends of the truss. It resists the outward thrust from the sloping rafters and helps hold the truss together.
3. Principal Rafters
Angled beams that form the roof pitch. They extend from the ends of the tie beam up to the apex or straining beam, transferring vertical loads from the roof to the supports.
4. Straining Beam (or Straining Piece)
A horizontal beam that connects the tops of the queen posts, helping them resist the inward pressure from the rafters. It acts like a tension or compression tie depending on the roof load.
5. Struts
Diagonal braces that run from the center of the tie beam to the principal rafters. They help distribute the roof load more efficiently and reduce bending stress in the rafters.
6. Optional Purlins
Horizontal members that sit across the rafters, supporting the roofing material and helping transfer loads evenly.
Queen Post Truss Span Chart
Below is a general reference for span capabilities based on timber size and roof pitch. Always verify with local building codes and a structural engineer.
Note: The Chart assumes C24 timber, truss spacing at 2m, and moderate snow/wind loads.
Queen Post Truss Design

When designing a Queen Post Truss, keep these points in mind:
A queen post truss is made with two upright posts, placed about one-third of the way from each end of the span. These posts are joined at the top with a horizontal beam, making a big rectangle in the middle.
On shorter spans, this rectangle might be left empty. But when the span is longer or the roof might get heavy snow or strong wind on one side, the middle can start to twist or bend. That’s why builders often add diagonal braces in the center—to help the truss stay firm and steady.
This type of setup is common in open spaces like lofts or building a barn, where you don’t want columns in the middle of the room. Queen post trusses give you that wide, open feel and show off the timber for a natural look.
Just remember—without those center braces, it’s more of a flexible frame than a strong truss. So those extra pieces really matter.
Other than these, a queen post truss dimension is:
1. Span and Height
- Ideal span: 8–12 meters. In some cases, the span ranges from 16 to 40 feet (4.9 to 12.2 meters).
- Rise typically between 20–30% of span.
- And the overall height ranges from 2’8″ to 20′ (0.81 to 6.1 meters).
2. Pitch
- Roof pitch should be 30° to 45° for optimal load transfer.
- So, the pitch ratio is typically between 1:1 to 1:6.
3. Load Analysis
- Dead Load: Roofing material, timber self-weight
- Live Load: Snow, maintenance access
- Wind Load: Depends on location/exposure
4. Joint Detailing
- Use mortise-and-tenon joints or steel plates and bolts for stronger, more precise connections
5. Deflection Limits
- Limit tie beam deflection to L/300
- Lateral bracing may be required in long-span trusses
Queen Post Truss Calculation

1. Determining Roof Pitch
The pitch angle (θ) of the roof can be calculated using the height (H) and span (L):
θ=tan−1(H/L)
Example:
If the height is 4 feet and the span is 12 feet,
θ= tan−1(4/12)
= tan⁻¹(0.333)
≈18.43°
2. Calculating Rafter Length
Using the Pythagorean theorem:
Rafter Length,
l =√L2+H2
Here,
L=span
H=Height
Example:
With a height of 4 feet and a span of 12 feet:
l= √(12)2+ (4)2
≈12.65 feet
3. Load Calculations
As said above, when analyzing a Queen Post Truss, consider the following loads:
- Dead Load
- Live Load
- Environmental Factors
Example calculation:
Let’s consider a snow load of 1 kN/m² and truss spacing of 2 meters:
Therefore,
Line Load = 1 kN/m² × 2 m
= 2 kN/m
4. Calculating Reaction Forces
For a statically determinate truss, the reaction forces can be calculated using the equilibrium equations:
- Sum of Horizontal Forces:
∵ H = 0
∴ ∑H=0
- Sum of Vertical Forces:
∵ V = 0
∴ ∑V=0
- Sum of Moments:
∵ M = 0
∴ ∑M=0
Example:
If the total vertical load is 16 kN and the truss has two supports (A and B):
Av + Bv = 16 kN
Assuming symmetrical loading and supports at equal distances from the load:
Av = Bv = 16/2 kN
= 8 kN
This assumes the load is evenly distributed or symmetrically placed and that both supports share the load equally.
If the load isn’t symmetrical or the geometry of the truss is not symmetric, you’d need to take moments about one support to solve for reactions.
So, let’s walk through how to handle an asymmetrical loading case with possible horizontal reactions.
5. Calculating Reaction Forces (Asymmetrical Load Example)

We’ll use static equilibrium:
∑H=0 — horizontal forces
∑V=0 — vertical forces
∑M=0 — moments about a point (usually one of the supports)
Now for the Queen truss with two supports:
Support A: Pinned (can resist both horizontal and vertical forces → Aн, Av)
Support B: Roller (can only resist vertical forces → Bv)
Let’s consider a 16 kN point load is applied 4 m from Support A on a truss that is 10 m long.
Sum of Moments about Point A-
To eliminate Aн and Av from the equation and solve for Bv:
∑ M=0
= Bv. 10−16⋅4
∴ Bv = 64/10
=6.4 kN (upward)
Sum of Vertical Forces-
∑V=0
Av + Bv-16
∴ Av = 16−6.4
=9.6 kN (upward)
Sum of Horizontal Forces
Assuming there are no external horizontal loads:
∵ ∑H=0
∴ Aн = 0
6. Member Force Analysis / Joint Calculation to find the internal force of a Queen Post Truss
Now, according to our consideration, we have got the forces. Now we can calculate the joints or the member force.
For that, let’s check the diagram below-

Here,
Bottom chord: M1–M5
Top chord: M6, M7
Diagonals: M8, M9, M10, M11
Vertical queen posts: M12, M13
Let’s calculate the internal forces using the method of joints. We’ll start at Joint A, since it only has two unknowns and known external reactions — an ideal starting point.
From above calculation, we got,
Point Load: 16 kN at 4 m from Support A
Span: 10 m
Support reactions:
Av = 9.6 kN
Bv = 6.4 kN
Step 1: Analyze Joint A
Connected members:
- M1 (horizontal, to the right)
- M8 (diagonal, upward to the right)
- Reaction force Av = 9.6 kN
Horizontal components:
∑ Fx = 0
FM1 – FM8 x cos(θ) = 0
Vertical components:
∑Fy = 0
FM8 x sin(θ) = 9.6
Member M8 goes from A (0, 0) to (2.5, 2)
Where,
Height = 2 m
Span = 2.5 m
θ=tan−1(2.52)
∴ sin(θ) = 2/√((2.5)² + (2)²)
= 2/3.2
=0.625
∴ cos(θ) = 3.5/3.2
=0.78125
Therefore,
FM8 x 0.625 = 9.6
⇒FM8=9.6/0.625
=15.36 kN
Putting this value, we get
FM1 = FM8 x cos(θ)
=15.36 v 0.78125
=12.0 kN
Now, let’s continue with Joint B, which is the right support of the truss.
Connected members:
- M5 (horizontal, to the left)
- M11 (diagonal, up-left)
- Reaction force Bv = 6.4 kN
We’ll again assume all unknown member forces are in tension (pulling away from the joint).
From B (10, 0) to top node (7.5, 2)
Where,
Span = 2.5 m
Height = 2 m
Therefore,
Length = √((2.5)² + (2)²) = 3.2 m (same as M8)
So:
sin(θ)=2/3.2
=0.625
cos(θ)=2.5/3.2
=0.78125
Sum of vertical forces:
∑Fy = 0
=0:FM11⋅sin(θ)
=6.4
⇒ FM11 = 6.4/0.625
= 10.24 kN
Sum of horizontal forces:
∑ Fx = 0
FM5−FM11 x cos(θ) = 0
⇒ FM5 = 10.24 x 0.78125
= 8.0 kN
So, two member forces are:
Joint A:
- M1=12.0 kN → Tension
- M8=15.36 kN → Tension
Joint B:
- M5=8.0 kN → Tension
- M11=10.24 kN → Tension
Similarly, calculate the forces of all other joints as needed.
How To Build a Queen Post Truss
Here’s a basic step-by-step building process for a queen post roof truss:
- Design Approval
Begin with approved architectural and structural drawings. Verify span, rise, load data, and compliance with codes. You can also learn how to order roof trusses. - Material Selection
Use seasoned timber like Douglas Fir, Southern Yellow Pine, or Glulam for large spans
Source high-quality, seasoned timber and hardware. Ensure uniformity in moisture content and grain alignment.
- Timber Cutting
Measure and cut each component—tie beam, queen posts, rafters, straining beam, and struts—according to the design specifications. - Pre-assembly on Flat Surface
Lay out components on the ground or workshop floor. Check angles and lengths to ensure a flush, square fit before joining. - Jointing and Fastening
Use traditional timber joinery (like mortise and tenon) or structural connectors such as gusset plates and bolts. Double-check joint tightness and alignment. - Erection with Crane or Scaffold
Lift the assembled truss using cranes or pulleys. Set it in place between wall plates or support beams. Ensure it’s level and plumb. - Final Alignment and Bracing
Once positioned, install temporary bracing until the roof is fully sheathed. Secure truss ends with anchors, bolts, or straps. Check for alignment and correct any deflection.
Exploring Queen Post Trusses and not sure how they compare to other designs? Our Roof Truss Design Guide shows where each truss fits best with simple visuals and smart tips to help you pick the right one for your next build.
Queen Post Truss Advantages and Disadvantages
Advantages
- Handles longer spans than king post
- Provides a strong, symmetrical look
- Good structural integrity for mid-sized buildings
Disadvantages
- More complex than king post
- Heavier and requires more support during installation
- Costlier in materials and labor
Applications of Queen Post Truss
Though queen post truss is mostly used for small to medium size house or residential purposes, here are some other applications, such as-
- Vaulted ceiling homes
- Sheds and barns
- Historic timber-framed buildings
- Churches and halls
- Covered walkways or pedestrian bridges
Final Words
The queen post truss is an ideal choice for projects that need more span than a king post can offer—but without jumping to overly complex truss systems. With its clean lines, solid support, and adaptability, it strikes a perfect balance between function and form.
However, if you need more technical guidance, contact us to get an idea about your next build, from consultation to truss design and build.
FAQs
What Is a Queen Post Truss?
The queen post roof truss is a basic type of roof truss structure where two vertical posts, known as the queen posts, are used along with two rafters and a tie beam to support the entire structure. The main difference between the king post truss and the queen post truss is the king post truss has a single vertical post, and the queen post truss has double.
How Far Can a Queen Post Truss Span?
Generally, the rule of thumb is a queen post truss span can range between 8 and 8–12 meters. But in some cases, you can find some queen post trusses up to 16 meters, which is rare and isn’t always possible.
What Is a Modified Queen Post Truss?
A modified queen post truss is a type of queen post truss where the queen posts are modified and the entire truss is made up of 8 triangular structures. The central vertical post known as the king post supports the roof, and the diagonal webs help evenly distribute the weight.