
Worried your new build could fail inspection because of a small framing slip? Many roof truss mistakes start long before the first truss leaves the ground, and they can cost you time, money, and peace of mind.
You only get one good shot to set trusses right. Miss a step and you invite sag, leaks, nail pops, and a long list of callbacks. Crews are skilled, but the pressure to move quickly can lead to skipping the plan, changing parts in the field, or rushing bracing and connections.
Here is the simple truth: Most problems are preventable when you follow the engineered drawings, lock in the layout, and install the right connectors and bracing at the right time.
In this guide, we will name the top roof truss mistakes, show you how to avoid each one, and give quick checks you can use on-site to protect roof strength and pass inspections the first time.
For a deeper walkthrough, see our roof truss design guide.
Let us get into it.
The 10 Roof Truss Mistakes to Avoid
These are the easy-to-miss errors that blow budgets and delay inspections. Use this as a quick checklist before the first truss is set. Skim each item, grab the quick action, and keep your frame straight, safe, and on schedule.
Mistake 1: Setting Trusses Without Engineered Drawings
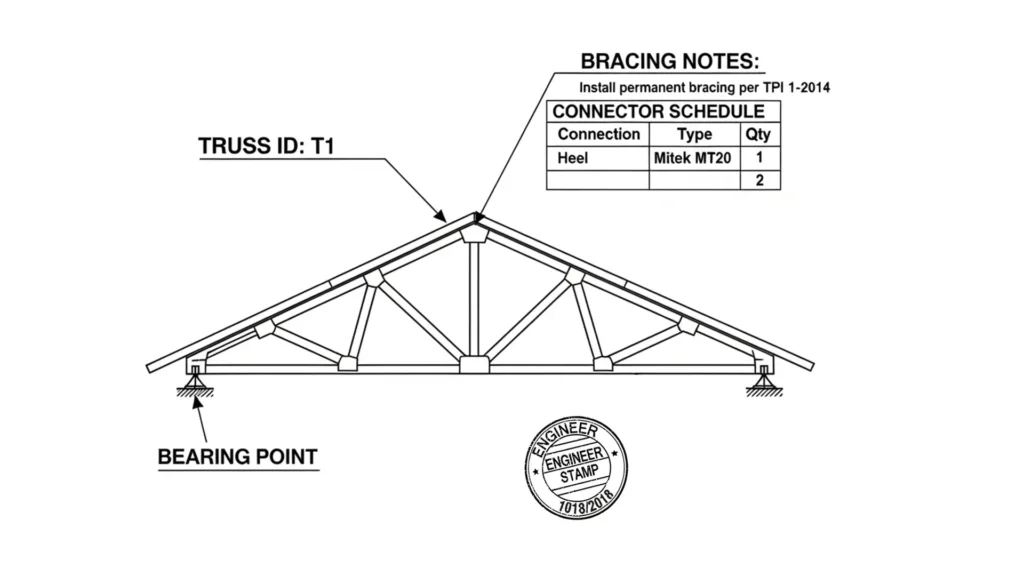
What Goes Wrong
Crews rely on memory or an old plan. Truss IDs do not match the layout. Bearing points are missed. The first truss is not square, and everyone copies the error after that. Roof structural integrity drops before sheathing even starts.
How to Avoid It:
- Bring the current engineered truss drawings to the site and keep them at the setup area.
- Match each truss ID to the plan before lifting.
- Confirm spans, heel height, bearing length, and any special notes for uplift and bracing.
- Snap layout lines, square the first truss to the wall line, and set a spacer for consistent on-center spacing.
- Do a quick huddle so the whole crew knows the sequence and connection details.
Quick check: Are the drawings stamped and tied to this address, as well as the revision? If not, stop and get the right set.
Bottom line: The drawings are the rule book for engineered truss systems. Follow them, and you will protect load paths, code compliance, and your schedule.
Mistake 2: Wrong Spacing Or Layout Off The Walls
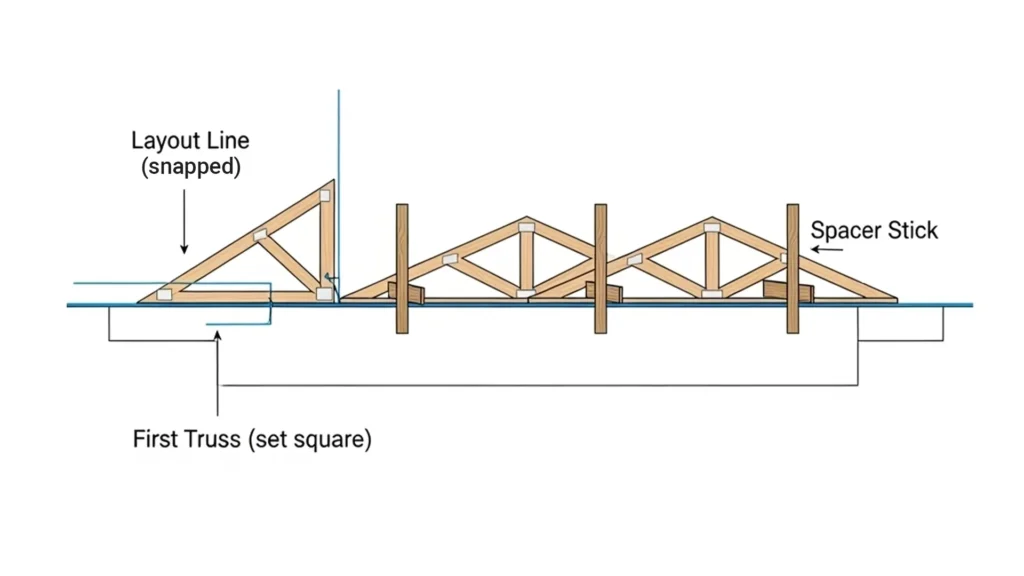
What Goes Wrong
The first truss is not set square to the layout line. Spacing drifts, so you end up tight in some bays and wide in others. Sheathing edges miss framing, clips do not land, and the roof waves. This invites leaks, nail pops, and noise when the wind hits.
How to Avoid It:
- Snap clear layout lines on the top plates at the start.
- Set the first truss dead square to the wall line and brace it in place.
- Use a measured spacer or factory spacing stick to hold on-center distances as you go.
- Check the layout at every fifth truss and adjust before it grows into a bigger error.
- Confirm end truss and gable conditions match the drawings before you sheath.
Pro move: Lock temporary lateral bracing on the top chords as each truss is placed. It keeps spacing true while you work.
Why this matters: The correct layout keeps load sharing even, helps sheathe land cleanly, and prevents a wavy roof that fails inspection or annoys homeowners.
Mistake 3: Cutting Truss Members For Ducts Or Pipes
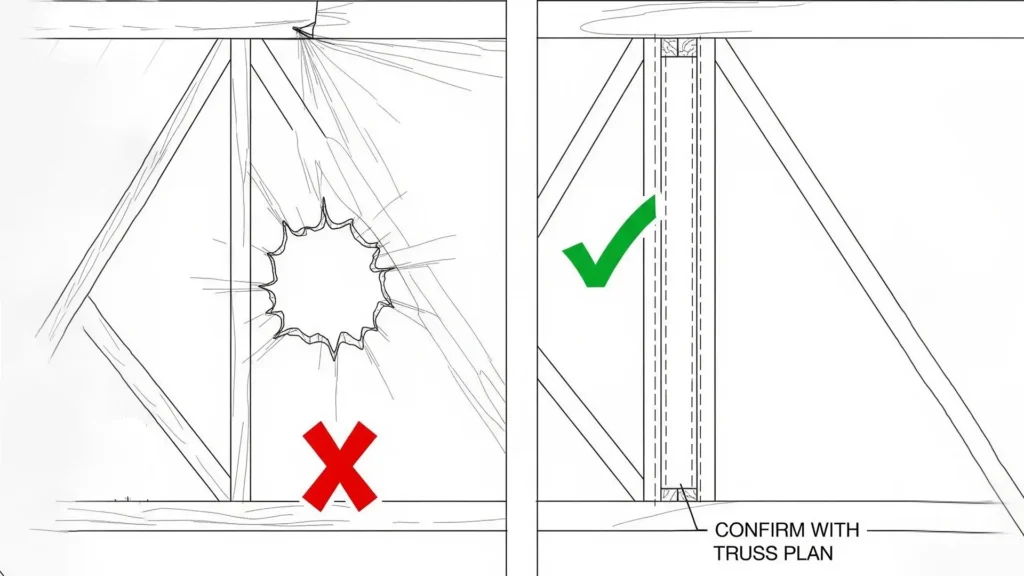
What Goes Wrong
Someone notches a top chord, drills a web, or trims a heel to make room for duct, vent, or pipe. That cut breaks the load path and weakens the truss. You may not see the damage right away, but the roof can sag or crack later.
How to Avoid It:
- Do not cut, notch, or drill any truss part.
- Plan MEP routes before framing so ducts and pipes use framed chases or open bays.
- If a clash shows up, stop and call the truss engineer for a repair detail.
- Use only the repair and parts the engineer specifies. Keep the written approval with your permit set.
- After repair, install any added bracing or plates exactly as drawn.
Watch out: Even a small notch can void the truss warranty and fail inspection.
Key takeaway: A single unapproved cut can turn a safe roof into a risk. Get engineer approval every time.
Mistake 4: Skipping Temporary Bracing While Setting
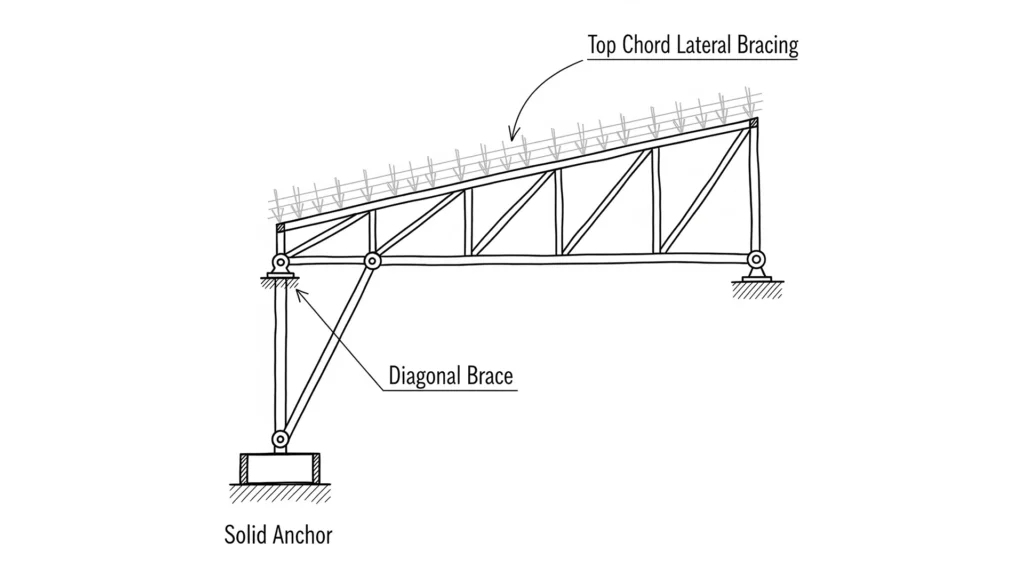
What Goes Wrong
A few trusses go up, the wind shifts, and the line starts to rack or buckle. With no temporary bracing in place, a small push can turn into a domino fall. Crews get hurt, trusses get damaged, and the schedule slips.
How to Avoid It:
- Follow the bracing notes on the truss drawings before the first lift.
- Install top chord lateral bracing and at least one diagonal brace as each truss is set.
- Brace the first truss solid to the wall line so the rest follow true.
- Add braces at regular intervals and at gables, hips, and valleys per the plan.
- Do not remove temporary bracing until permanent bracing and sheathing are installed.
Safety note: Assign one person to watch bracing during the set. Their only job is to keep the frame stable as the line grows.
Why this matters: Temporary bracing controls sway and twist so the trusses stay plumb, the spacing stays true, and the crew stays safe.
Use the OSHA roof truss installation fact sheet and the broader OSHA fall protection in residential construction guide to set up safe bracing and keep your crew protected.
Mistake 5: Uneven Or Out-of-Level Bearing Surfaces
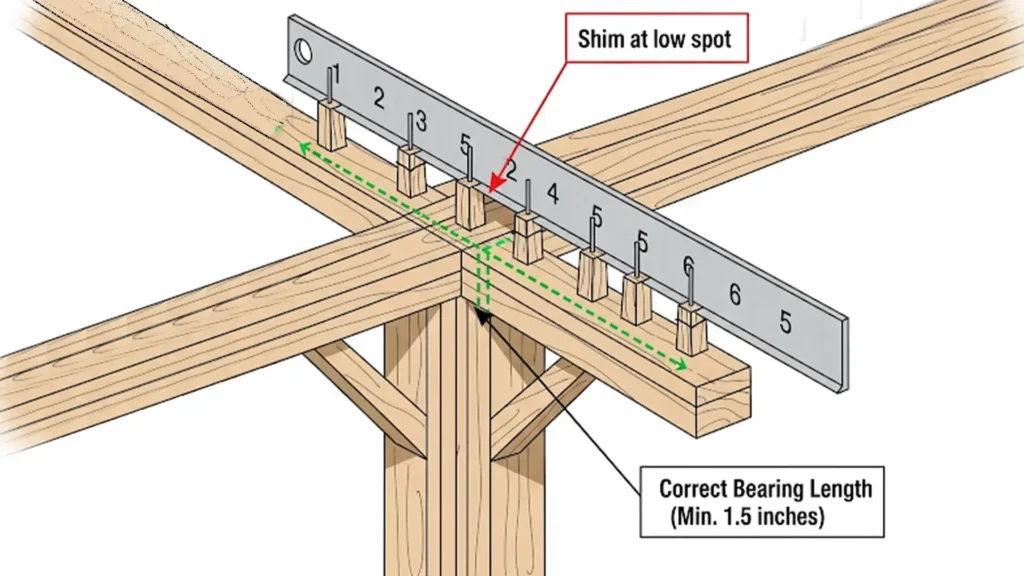
What Goes Wrong
Trusses rock on crowned plates or dip over low spots. The bearing is short at one end and long at the other. Loads do not transfer evenly, which shows up later as sag, cracked drywall, and roof noise when the wind picks up.
How to Avoid It:
- Check the wall plumb and top plate level across the full run before the first lift.
- Plane high spots and shim low areas per the plan and local code.
- Verify that the bearing length at each support matches the truss drawings.
- Confirm heel height and seat cuts sit flush on the plate with no gaps.
- Recheck the level after you set the first truss so the rest follow true.
Heads up: A short bearing length can slash capacity. Measure and compare to the engineered drawings before you commit.
Why it matters: Even bearing shares load as designed. Uneven bearing forces the truss to work harder and can lead to movement, squeaks, and failed inspections.
Mistake 6: Ignoring Uplift And Lateral Restraint
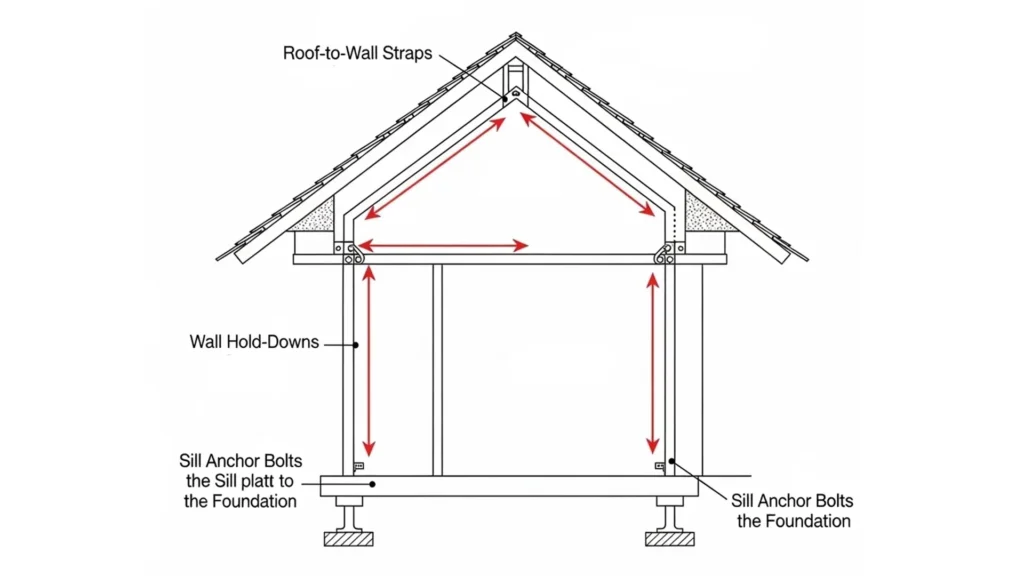
What Goes Wrong
Clips, ties, and straps are missed or swapped. The load path from the roof to the walls to the foundation is broken. In a strong wind, the roof can lift, shift, or peel at the edges. Gable ends rack and crack.
How to Avoid It:
- Install the exact connectors shown on the truss drawings at every location.
- Create a continuous load path from the roof through the walls down to the foundation with approved ties, straps, and anchor bolts.
- Match the connector models and nail length to the schedule. Do not substitute unless the engineer signs off.
- In higher wind zones, add specified hold downs, ring shank nails where noted, and bracing at gable ends.
- Record connector checks on a simple punch list before sheathing.
Risk check: Ask your supplier for the wind speed and exposure your county uses, then confirm your connector schedule matches it.
Key point: A continuous load path keeps wind forces moving safely through the structure instead of tearing parts loose. FEMA recommends a continuous load path and stronger connections to improve the wind performance of roofs.
Mistake 7: Using The Wrong Hangers, Nails, Or Nailing Pattern
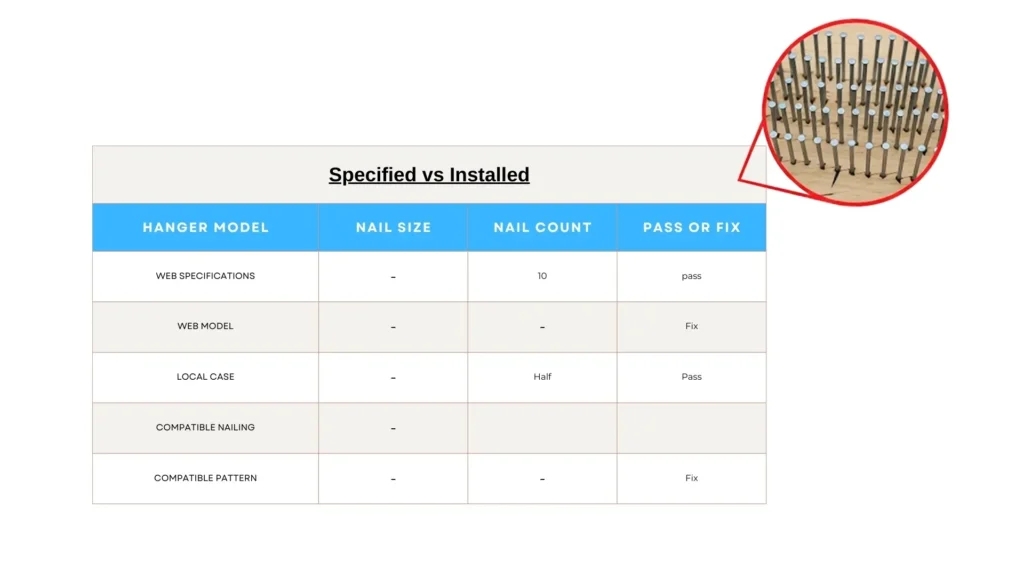
What Goes Wrong
A crew swaps the specified hanger for a look-alike. Nails are the wrong length or type. The nailing pattern is guessed instead of checked. Connector capacity drops, and the joint no longer carries the load the engineer assumed.
How to Avoid It:
- Match hanger model numbers to the truss drawings and cut sheets before installation.
- Use only the nails listed for that hanger. Length, shank, and count matter.
- Drive nails in every required hole unless the sheet shows an alternate pattern.
- Do not replace nails with screws unless the engineer and the cut sheet say it is allowed.
- After installation, do a quick side-by-side check: model, nail size, and nail count.
Tool tip: Keep printed cut sheets in a clear sleeve at the work area so anyone can verify the model and nailing at a glance.
Bottom line: The right hanger with the right nails gives you the strength the design expects. A small swap can cut that strength in half.
Mistake 8: Skipping Permanent Bracing On Webs And Chords
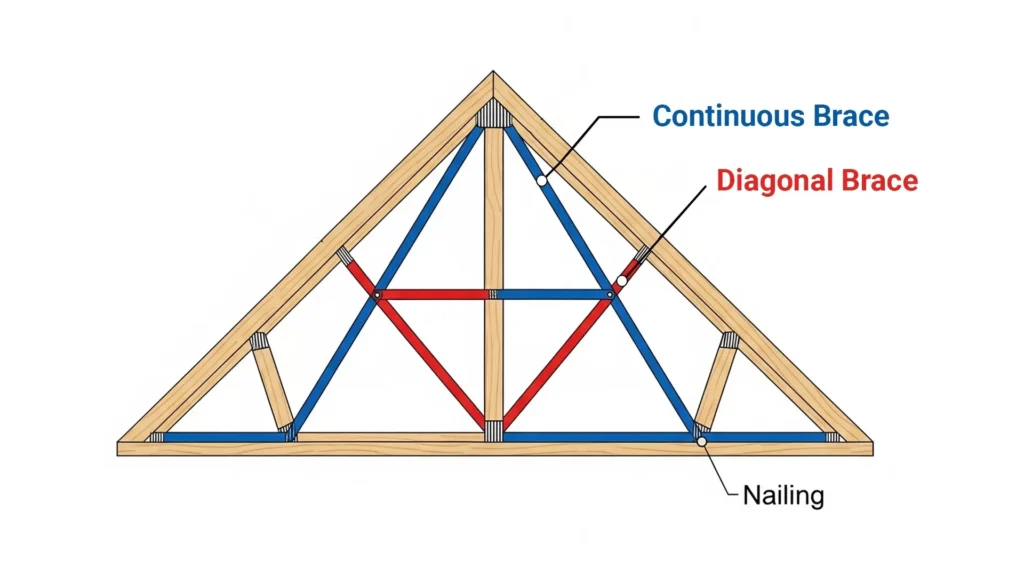
What Goes Wrong
After sheathing, crews forget the permanent bracing lines shown on the truss drawings. Webs are left unbraced and can buckle under load. Gable ends rack. Over time, the roof may sag, creak, or crack drywall.
How to Avoid It:
- Read the truss drawings for all required bracing lines on webs and chords.
- Install continuous lateral bracing where shown, then lock it in with diagonal bracing to create a stable triangle.
- Use the fastener type, length, and spacing that the plan calls for.
- Do not rely on roof sheathing alone. Sheathing helps, but it does not replace the bracing the engineer specified.
- Mark each required brace on a simple checklist and sign off before final inspection.
Quick reminder: The truss drawings are your map. Every bracing line shown needs to be in the frame, not just in the plan set.
Why this matters: Permanent bracing keeps slender members from bowing and preserves roof strength for the life of the home.
Mistake 9: Loading The Trusses Too Soon
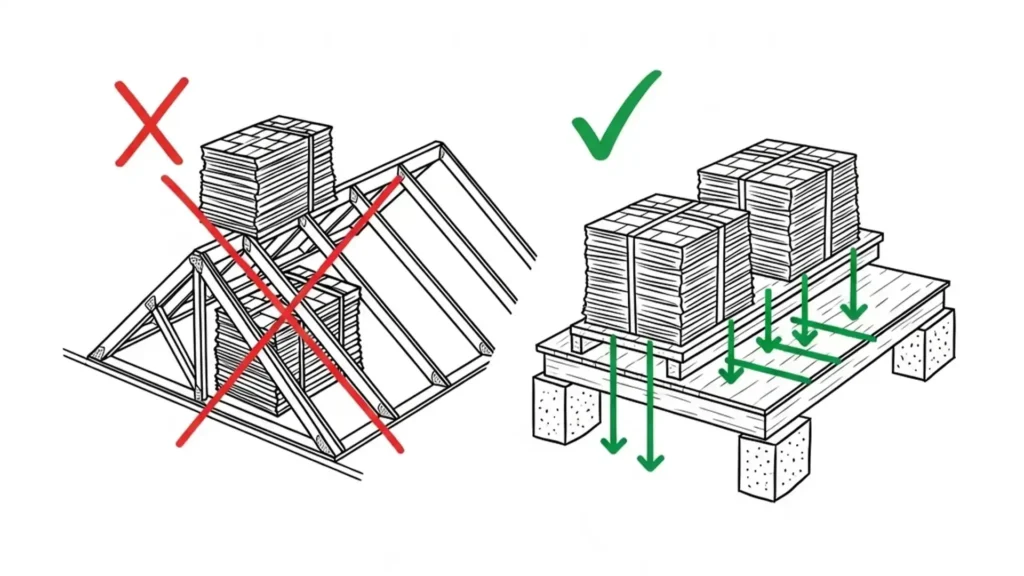
What Goes Wrong
Bundles of shingles or stacks of panels get placed on a frame that is not braced or sheathed yet. The weight pushes chords out of line, twists webs, and leaves hidden damage that shows up later as sag or cracks.
How to Avoid It:
- Do not store materials on trusses until permanent bracing and required sheathing are in place.
- Follow the truss drawings for any temporary load notes or staging locations.
- If you must stock on the roof, wait until the engineer approves that conditions are met and spread the weight evenly over the bearing walls.
- Use ground-level staging or supported floors for heavy bundles whenever possible.
- Assign one person to sign off on bracing and sheathing before any rooftop stocking begins.
Do this instead: Keep heavy loads on supported floors or on the ground until the roof is braced and sheathed per plan.
Key takeaway: Early loading can bend members and weaken connections even if nothing breaks that day. Protect the frame and your inspection by waiting until the system is ready.
Mistake 10: Changing The Design Without Engineer Approval
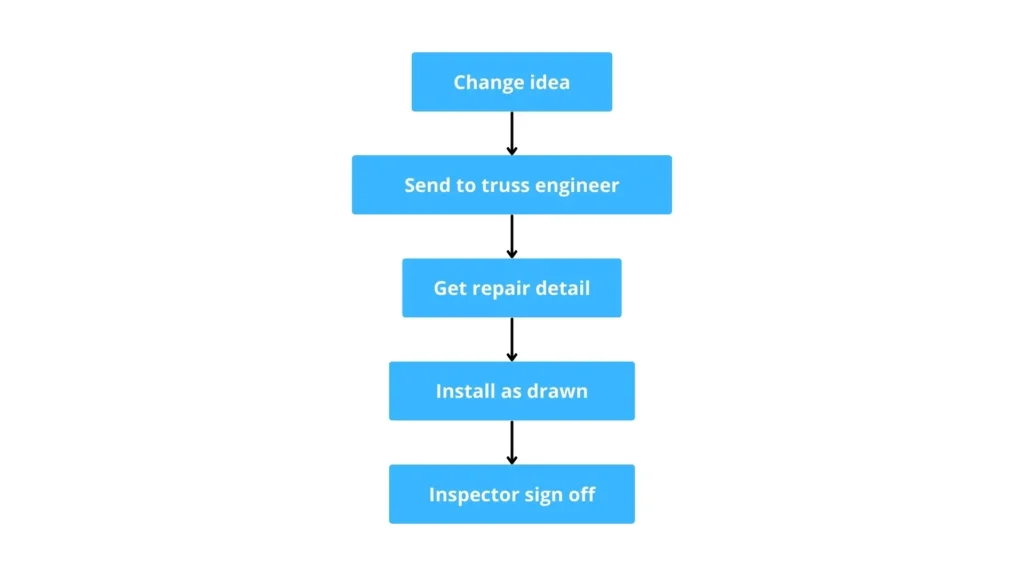
What Goes Wrong
Someone removes a bearing wall, adds a dormer, or stores heavy boxes on the bottom chords that were not designed for storage. The load path changes, and the truss no longer works as engineered. You risk failed inspections, structural damage, and warranty issues.
How to Avoid It:
- Do not change any part of the truss or its support without written approval from the truss engineer.
- Send a clear sketch and photos to the supplier or engineer and wait for the repair details.
- Follow the repair exactly, including plates, blocks, bracing, and fasteners.
- Update your permit set with the signed repair and keep a copy on site for the inspector.
- If plans change mid-build, ask for a revised truss layout before you proceed.
Paper trail: Keep the engineer’s letter and repair sheet with your permit. It proves the change is safe and code-compliant.
Bottom line: Unapproved changes can break the design, fail inspection, and void coverage. Get written approval every time.
Quick reference table: spacing, bearing, connectors
Use this as a fast field check before you set or sheath. Compare to your truss drawings and local code.
| Item | Typical range | Check against | Notes |
| Truss spacing | 16, 19.2, or 24 inches on center | Engineered truss layout. | Use a spacer stick to hold spacing as you go. |
| Bearing length at seats | Per plan, often 3.5 to 5.5 inches | Truss drawings and cut sheets. | Short bearing reduces capacity. Shim or plane plates to level. |
| First truss alignment | Square to snapped layout line. | Snap lines on top plates. | Brace the first truss solid so the line stays true. |
| Temporary bracing during the set | Lateral on top chords and one diagonal. | Truss bracing notes. | Add lateral and diagonal braces while setting. |
| Permanent web bracing | All lines shown are installed. | Truss drawings. | Do not rely on sheathing to replace required bracing. |
| Uplift connectors | Correct model, nail size, and count. | Connector schedule. | Match model numbers and nail size and count. |
| Hangers and nailing | Model, nail size, and nail count. | Manufacturer cut sheet. | No substitutions without the engineer’s approval. |
| Material staging on the roof | Only after bracing and sheathing. | Engineer notes. | Spread loads over bearing walls if allowed. |
Field tip: Print this table and keep it with your permit set. Check off each line before inspection.
Why this helps: A two-minute check here can save hours of rework and delays later.
When to call an expert
You do not need an engineer on speed dial for every step, but there are moments when a quick review can save days of rework.
Call Right Away If You See
- Any cut, notch, or drilled hole in a truss member.
- The layout does not match the stamped drawings.
- Bearing length that is short or a top plate that is not level across the run.
- Missing or substituted connectors, ties, or hangers.
- A change in plan, such as removing a wall, adding a dormer, or using attic storage.
- Wind zone or exposure that differs from what the design assumed.
- Trusses that racked during the set or show twist after bracing.
Save time: Send clear photos, the truss ID, and the issue in one message to your supplier or truss engineer. Most repairs are fast when the details are sharp.
Why this helps: Early advice keeps the load path intact, protects code compliance, and prevents hidden damage that shows up after the roof is closed.
Conclusion
You can avoid most roof truss mistakes by keeping the engineered drawings on site, setting the first truss square, bracing during the set and after, matching connectors and nails to the plan, and getting written approval before any change. Do these simple things, and you protect roof strength, pass inspection with less stress, and keep your schedule moving.
Prefer a pro to look it over? Structural Wood Corporation can review your truss package, confirm bracing details, or provide a quick framing consult. No pressure. Ask a question or request a free quote when you are ready.
Build it right the first time, and your roof will serve you well for years.
FAQs
What are the most common roof truss mistakes in home builds?
Skipping engineered drawings, drifting layout, cutting members for services, missing bracing, and using the wrong connectors. These roof truss mistakes cause weak load paths and failed inspections.
Can I cut a truss member to fit a duct or pipe?
No. Cutting any chord or web changes the load path and can void approvals. If there is a clash, stop and get a repair detail from the truss engineer.
How do I know the correct truss spacing for my project?
Follow the engineered truss drawings and local code. Do not guess or copy another job. If anything is unclear, ask your truss supplier or engineer to confirm.
Do I need special ties for wind uplift?
Yes. Use roof-to-wall connections that complete a continuous load path so wind forces move safely into the walls and foundation. FEMA guidance highlights these retrofits and connections for stronger roofs.
Do I need fall protection when setting roof trusses?
Yes. OSHA requires fall protection and provides guidance and examples for safe truss erection and anchoring methods during residential construction.