Have you noticed a ceiling that looks a little low or a roofline that no longer feels straight after a heavy rain?
Maybe a crack has formed near a joint, and you are wondering what it means. When you start searching, the terms get scary fast.
Bottom line: Many common roof truss problems start small and stay hidden until moisture, extra weight, or a missed detail turns them into real trouble. Catching issues early saves money, keeps your home safe, and prevents stress.
In this guide, you will learn how to spot the signs of roof truss damage, what usually causes sagging or cracked joints, the safest ways to fix damaged trusses, when to choose DIY and when to call a professional, what repairs may cost, and how to prevent problems with a short inspection routine.
You want clear steps and no confusion. You will get both. Let us get into it.
Common Roof Truss Problems and How to Fix Them
If you see a dip in the ridge or hairline cracks near a joint, you are not unlucky. You are looking at common roof truss problems with clear causes and reliable fixes.
The goal is simple. Find the problem early, match it to the cause, choose the right repair, and then prevent it from coming back.
Understanding Roof Truss Problems
Roof trusses carry the roof load to the walls and down to the foundation. When any link in that load path weakens, stress flows to the next weakest spot. Small defects then grow into structural roof support issues.
What a roof truss actually does:
- Spreads the weight of roofing, snow, and wind across the top and bottom chords and webs
- Keeps the roof plane straight so ceilings stay level and walls do not rack.
- Works as a system, so one cracked joint can affect the whole span.
Quick insight: Trusses are strong as a team. A single damaged joint can shift loads and make nearby members work harder.
Why Small Errors Turn Into Big Problems
- Moisture softens wood and rusts plates, which reduces strength over time.
- Overloading from storage, extra layers of shingles, or heavy finishes causes sagging roof trusses.
- Movement from poor bracing lets members slip and crack.
- Design and installation mistakes include placing fasteners incorrectly or ignoring required bracing.
Do first: Trace the load path in your mind. Roof sheathing to truss, truss to top plate, top plate to studs, studs to sill, sill to footing. Any loose link is a repair target.
For a quick primer on continuous load paths from roof to foundation, see this continuous load path guide.
Root Causes at a Glance
- Water entry or high humidity
Signs: Dark stains, musty smell, soft spots near eaves.
Fix direction: Stop leaks, improve ventilation, dry the attic, and then repair members. - Added weight or impact
Signs: Dipped ridge, creaking after a heavy storm or new attic storage.
Fix direction: Remove extra loads and reinforce them with engineered repairs. - Connector plate or fastener issues
Signs: Lifted plates, visible gaps at joints.
Fix direction: Never nail through plates. Get a stamped repair detail. - Common roof truss design mistakes
Signs: Recurring cracks at the same web, inadequate bracing notes on old drawings.
Fix direction: Consult a truss engineer for a corrected detail and permanent bracing plan.
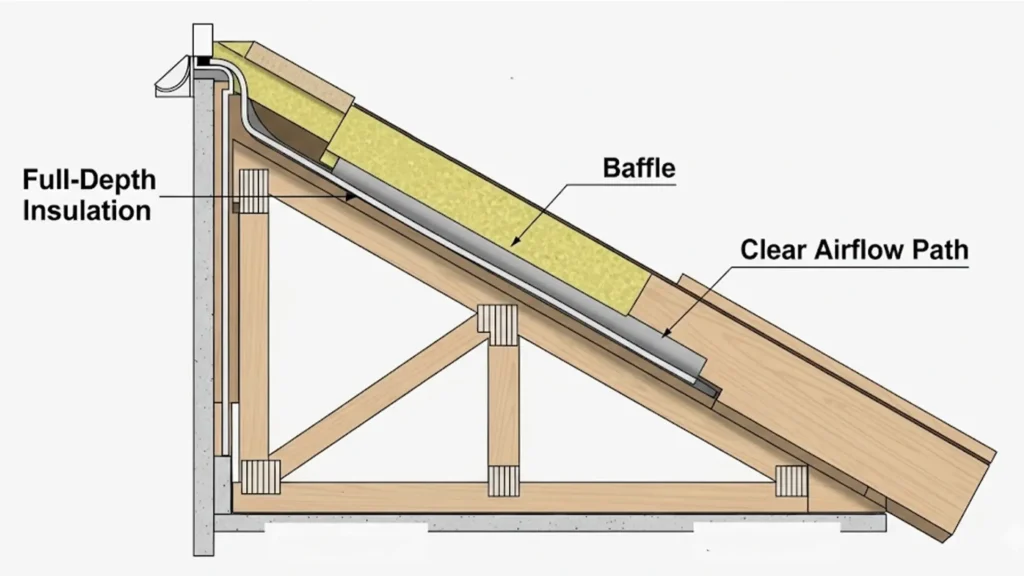
Note: Roof truss water damage often shows up first at the heel near the soffit, where insulation blocks airflow. Clear baffles and keep full-depth insulation.
Want the full background on truss design choices, load paths, spans, and roof shapes? See our Roof Truss Design Guide.
Signs You May Have Roof Truss Damage
Before you can fix anything, you need to know what to look for. These signs point to common roof truss problems and help you decide what to do next.
Inside the Living Space
- Sagging ceilings or a dipped ridge line
What this tells you: Possible overloading or moisture-softening members.
Action: Mark the low spot with tape; measure again in a week to see if it moves. - Cracks at ceiling corners or around door frames
What this tells you: Movement at bearings or joints.
Action: Photograph the cracks with a ruler for scale and track growth. - Doors that rub or stick suddenly
What this tells you: Framing has shifted and needs a closer look.
Action: Note the room location for your inspection checklist.
In the Attic
- Visible gaps at joints or plates that look lifted
What this tells you: Fasteners may be loose, or members have deformed.
Action: Do not add nails through plates. Record the truss ID from the stamp. - Dark stains, damp insulation, or a musty smell
What this tells you: Roof truss water damage or poor ventilation.
Action: Check near the eaves, valleys, and around penetrations first. - Split or checked lumber near the heel or mid-span
What this tells you: Stress concentration or drying cracks that need evaluation.
Action: Note size and location with a quick sketch.
On the Roof and Exterior
- Uneven shingles or a wavy roofline
What this tells you: Sagging roof trusses or sheathing problems.
Action: View from the street at mid-distance to spot dips and humps. - Ice dams in winter or heavy algae streaks
What this tells you: Airflow and moisture control may be off.
Action: Plan to check soffit and ridge vents for blockages.
Quick check: If you see more than one of these signs in the same area, treat it as a priority zone for inspection.
What to avoid right now: Do not cut members to “relieve stress.” Do not add field screws or nails to connector plates. Both moves can make repairs harder and costlier.
The Most Common Roof Truss Problems
Sagging Roof Trusses
What you see: A dipped ridge, wavy roofline, or ceilings that look low in the middle.
Why it happens: Extra weight from storage or a second roofing layer, long spans without proper bracing, or moisture softening members.
What to do now?
- Remove any stored items from the attic above the sag.
- Mark the low point and recheck in a week to see if it moves.
- Call a truss engineer if the dip grows or doors start to stick.
Safe repair directions
- Reinforce members with engineered sister members or steel brackets per a stamped detail.
- Add the permanent bracing shown on the drawings to lock the shape.
- Improve attic airflow so lumber stays dry.
Tip: A simple string line from end to end helps you see if the ridge is dipping and by how much.
Cracked or Broken Truss Joints
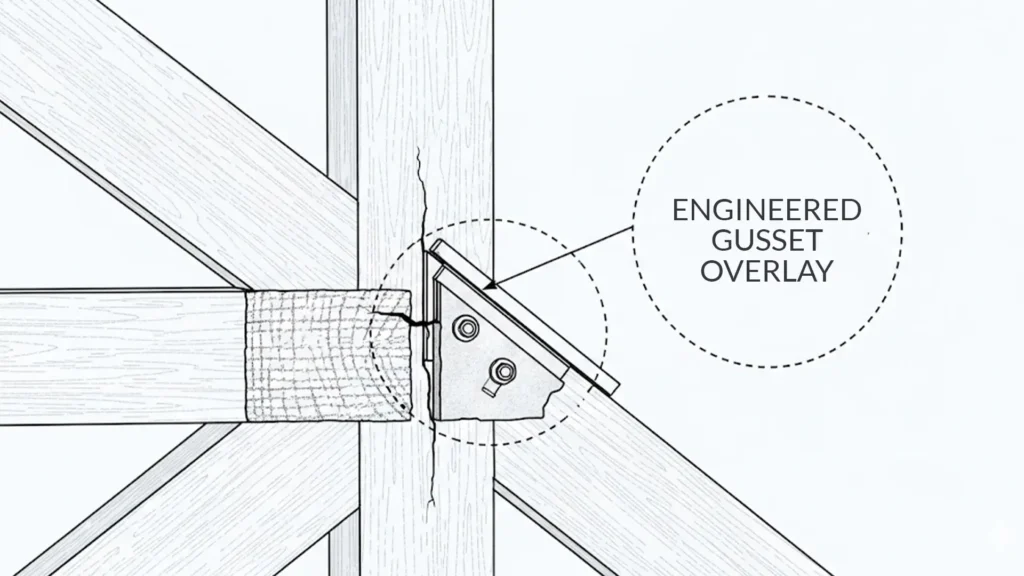
What you see: Hairline cracks near a plate, a visible gap at a joint, or a connector plate that looks lifted.
Why it happens: Stress at an unbraced panel, impact during construction, or fasteners that were placed incorrectly years ago.
What to do now
- Do not add nails or screws through the metal plate.
- Photograph the joint with a ruler for scale and note the truss ID from the stamp.
- Get a stamped repair detail from a truss professional.
Safe repair directions
- Install engineered gussets or reinforcement plates with the exact fasteners and pattern specified.
- Add web bracing across the run if the design calls for it.
- Re-anchor bearings if movement at supports caused the crack.
Warning: Jacking a sagging joint without a repair plan can shift loads and cause more damage in the next panel.
Roof Truss Water Damage
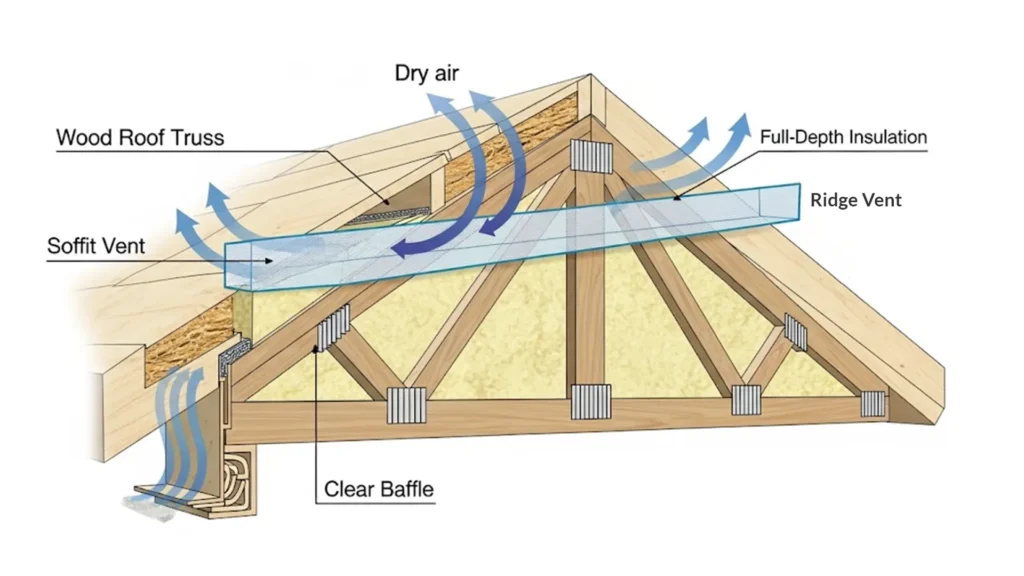
What you see: Dark stains on wood, rusty plates, damp insulation, or a musty smell near the eaves.
Why it happens: Roof leaks, blocked soffit vents, or bath fans dumping moist air into the attic.
What to do now
- Find and stop the water source first. Check flashings, valleys, and ridges.
- Clear soffit vents and add baffles so insulation does not block airflow.
- Dry the attic with fans and improve ventilation.
Safe repair directions
- Replace decayed members and corroded plates only under an engineered repair.
- Treat light surface mold after drying, then prime to seal stains if allowed by local guidance.
- Add a continuous air barrier at the ceiling plane to block moist indoor air.
Note: Water damage near the heel is common because insulation pinches and blocks the vent air at the edge. A raised heel truss or proper baffles keep full-depth insulation there.
Design or Installation Mistakes
What you see: Recurring cracks on the same web across several trusses, missing bracing, misaligned bearings, or members cut for ducts.
Why it happens: Shortcuts during construction, wrong spacing, incorrect hangers, or no permanent bracing after the roof went on.
What to do now
- Pull the stamped truss drawings and the permanent bracing plan.
- Check that spacing, bearings, hangers, and bracing match the drawings.
- If any member was cut for a chase or skylight, stop and get a repair design.
Safe repair directions
- Install the missing bracing and blocking exactly as specified to stabilize the system.
- Correct bearing issues with proper shims or hangers per design.
- Replace any field-cut members using engineered splices or replacement webs.
Quick check: If the same defect repeats every few trusses, you likely have a design or installation pattern issue rather than a single bad piece.
How to Fix Roof Truss Problems
You want clear steps and safe choices. Start with a quick plan, decide who should do the work, then follow an engineered repair so the roof stays strong.
Step 1: Make The Area Safe And Document What You See
- Clear storage from the attic above the problem area.
- Take photos of each joint and member. Include a ruler or tape in the picture.
- Write down the truss ID from the lumber stamp and where the issue sits along the span.
Tip: A simple sketch of the attic with photo numbers helps a pro give you fast, accurate advice.
Step 2: Decide on DIY or Professional Repair
DIY may be reasonable for minor housekeeping.
- Clearing blocked soffit vents
- Adding baffles to keep insulation from the eave airflow
- Placing temporary shoring on the floor below if a pro advises it
Call a truss engineer or licensed contractor when you see:
- A dipped ridge or a ceiling that keeps moving.
- A connector plate that looks lifted, a cracked joint, or a split member.
- Any member cut for ducts or skylights.
- Water stains and soft or decayed wood.
Warning: Never add nails or screws through metal plates, and never cut or notch members. Both moves weaken the system and raise the final repair cost.
Step 3: Follow an Engineered Repair Plan
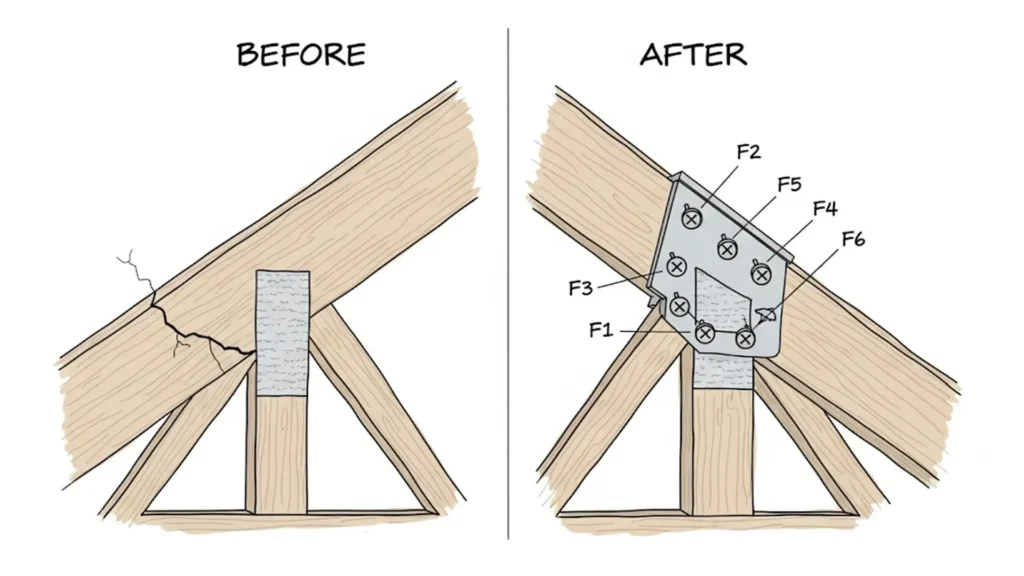
A stamped repair detail tells you exactly what to add and how to fasten it. Expect one or more of these moves.
- Sister members: Add new lumber beside a weakened chord or web. Fasten with the pattern and length in the repair note so both pieces share the load.
- Reinforcement plates or gussets: Install wood or steel plates over a cracked joint with the exact fastener size, count, and spacing shown in the plan.
- Load transfer or bearing fixes: Correct shims, hangers, or bearing seats so the truss sits square and tight at supports.
- Permanent bracing: Add the continuous lateral bracing and diagonal bracing called for on the drawings. Bracing locks the geometry so loads do not wander and cause new cracks.
Quick check: If the same problem repeats every few trusses, pause. You likely have a missing bracing line or a design pattern issue. Fix the system, not just one piece.
Step 4: Address Moisture And Ventilation at the Same Time
Repairs last longer when the attic stays dry and well-ventilated.
- Clear soffit vents and confirm a clean path to the ridge.
- Add baffles at each bay so insulation does not block airflow.
- Seal ceiling penetrations so that bath and kitchen air does not leak into the attic.
- Fix roof leaks at flashings, valleys, and penetrations before closing repairs.
Note: Water damage often begins at the heel near the soffit. Keep full-depth insulation at the edge and a clear air channel from soffit to ridge.
Step 5: Confirm The Fix And Monitor
- Take final photos from the same angles as your first set.
- Mark a reference line with a string across the area that sagged and measure the drop at mid-span.
- Recheck in two to four weeks. No movement means the repair is holding.
Reminder: Keep your notes and photos with your home records. If you sell later, a clear repair log builds buyer confidence.
What Does Roof Truss Repair Cost?
Prices vary by where you live and by the size and scope of the damage. Think in ranges rather than a single number.
- Minor ventilation and moisture fixes are usually on the low end.
- Engineered repairs for one or two joints land in the middle range.
- Wide sag, multiple members, or heavy water damage can move to the high range.
- Full replacement is rare but can be the most expensive path.
Quick insight: The least expensive repair is often the one you do early. A small gusset and added bracing can now prevent a major structural job later.
Preventing Roof Truss Problems Before They Start
A little routine beats a big repair. Keep water out, air moving, and loads where they belong.
Roof truss inspection checklist:
- Inside: Look for new cracks at ceiling corners, doors that stick, or a ridge that looks low.
- Attic: Check for dark stains, damp insulation, lifted plates, blocked soffit paths, and missing baffles.
- Roof and exterior: Clear gutters, confirm ridge and soffit vents are open, and scan for wavy shingle lines.
Moisture and airflow:
- Vent bathroom and dryer air to the outside, not into the attic.
- Add baffles at each bay so insulation does not block soffit air.
- Seal ceiling penetrations around lights and fans to stop warm indoor air from rising into the attic.
Loads and layout:
- Do not store heavy bins on cords or webs.
- Avoid a second roofing layer unless an engineer signs off.
- Never cut or notch members for ducts or wiring.
Quick tip: Do this checklist at the start of summer and winter, and after any severe storm.
Final Thoughts
Most roof truss problems start small and grow when water or extra weight is involved. If you spot the signs early, match each issue to a clear cause, and follow an engineered repair, you protect your home and your budget.
Stick to a simple routine. Do two quick inspections each year, keep air moving at the eaves, avoid heavy attic storage, and never make cuts without a plan. Small habits prevent big repairs.
If you want expert help with roof truss design or a stamped repair detail, Structural Wood Corporation is here with friendly advice and a free quote.
FAQs
What are the most common roof truss problems?
Sagging cords, cracked or lifted joints, and water damage near the eaves. These are the most common roof truss problems, and they usually trace back to moisture, extra weight, or missing bracing.
Can sagging trusses be repaired without replacing the roof?
Yes. Many cases respond to engineered reinforcement, proper bracing, and moisture control. Replacement is rare if you catch common roof truss problems early.
How much does roof truss repair cost?
Costs vary by scope and region. Minor ventilation fixes are low, single-joint repairs are mid, and wide sag or decay can be high. Early action on common roof truss problems keeps costs down.
Is DIY roof truss repair safe?
DIY is fine for housekeeping, like clearing vents or adding baffles. Structural work needs a stamped plan. For common roof truss problems at joints or bearings, call a professional.
How often should I inspect roof trusses?
Twice a year, and after major storms. A short checklist helps you spot common roof truss problems before they spread.