People know steel is strong, but they do not know how to design the truss correctly.
Every roof must handle gravity, wind, and sometimes snow. This is true for small sheds and big shops alike. This guide makes designing steel roof trusses simple.
What trips people up? The drawings look complex. Codes can be unclear. Steel sizes and joint choices get confusing.
The key truth is that good design is not about thicker steel. It is about a clear path for weight to travel and solid, simple connections.
This guide gives you clear steps. You will learn how to plan span and slope, pick the right truss shape, size the parts, choose safe joints, and know when to bring in an engineer.
Let’s get into it.
Step-By-Step Plan to Design a Steel Roof Truss
Start with the numbers, not the metal. This section walks you through span and slope to shape, sizing, joints, and final checks. Follow each step to get a safe, buildable truss without trial and error.
Step 1: Understand the Job and Load Path
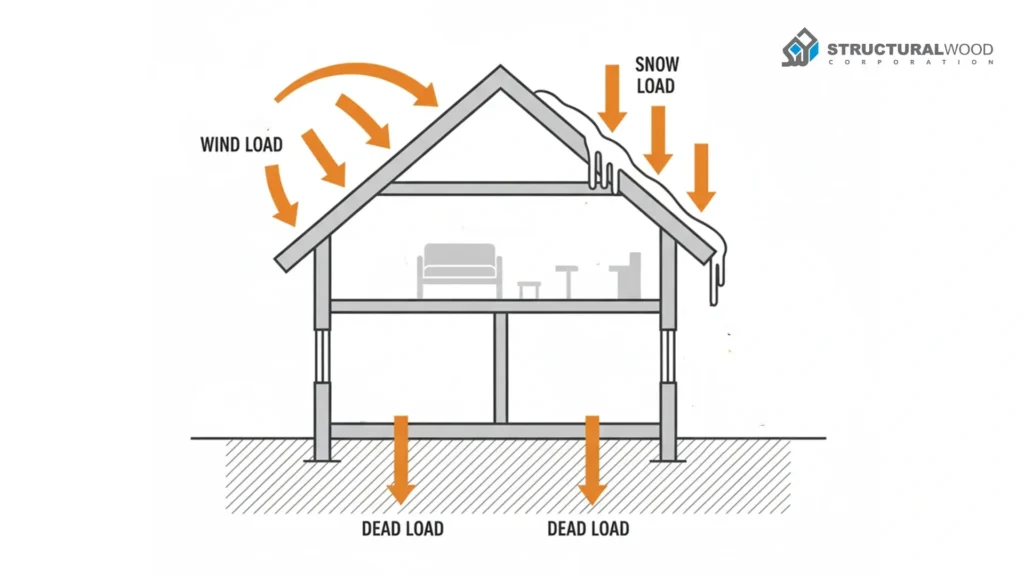
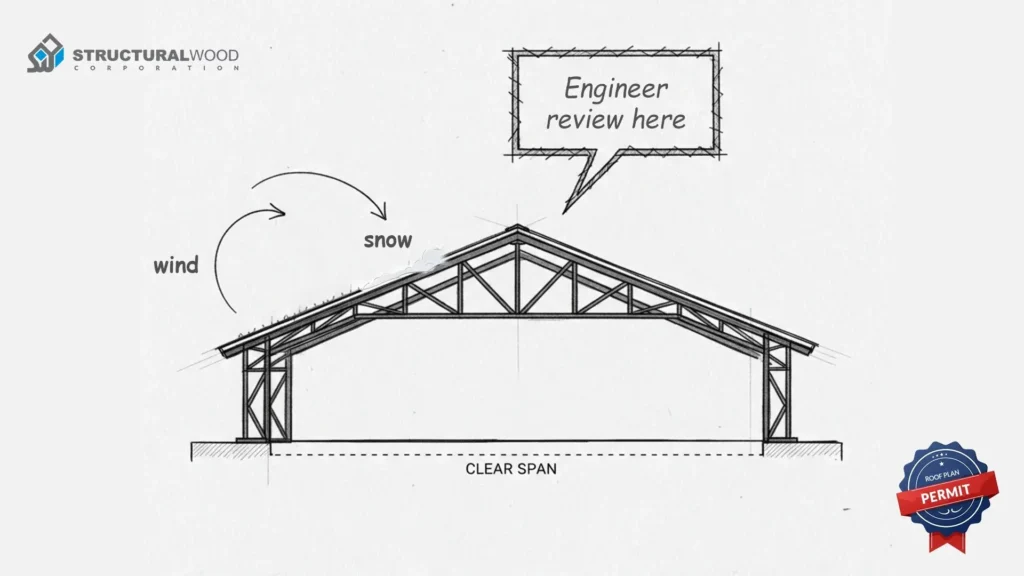
Before you draw a single line, be clear on the truss’s job: to carry roof weight to the supports and withstand wind and snow. That purpose guides the shape, size, and joining of each member.
How a Truss Moves Weight
Think of the truss as a bridge that carries roof weight to the walls and then to the ground. Wind and snow push down or lift up.
A safe design gives that force a clear path from the roof to the truss, the walls, and the foundation. FEMA explains this “continuous load path” idea for homes and small buildings.
Field check: Put your finger on the roof line in your sketch. Trace the path to each support. If the path is not clear, your design is not ready.
Why Steel is Used
Steel handles high tension and compression for long spans. It lets you keep the roofline slim while holding strong. Codes set the loads you must check, like dead load, live load, wind, and snow. Most building codes in the United States base their wind, snow, and other load rules on ASCE 7.
How a Steel Roof Truss Should Perform
A good steel roof truss keeps members in the right shape so each part shares the work. The top chord resists push, and the bottom chord resists pull. The web members pass forces between them, so no piece is overworked. HUD’s design guide shows how loads are the first thing to set in any building plan.
Pro Tip: Before sizing steel, write down the loads you must meet. Once the loads are clear, your later choices will be easier.
Step 2: Measure Span and Set Pitch and Confirm Local Loads
Most design trouble starts with the wrong span or an assumed slope.
How to Measure Roof Span
- Find the two bearing walls that will hold the truss.
- Measure the clear distance from inside face to inside face.
- Add the seat or bearing length the truss will sit on if your plan calls for it.
- Write this number down first. Every choice that follows depends on it.
HUD’s Residential Structural Design Guide treats loads and geometry as the first inputs to any roof design, not an afterthought.
Field check: If you are not sure a wall is bearing, look for a beam or posts under it, or ask your local building office. A wrong bearing line can sink the whole plan.
Set the Roof Pitch for Your Design
Pick a slope that fits your climate, the look you want, and the span you measured. Steeper slopes shed rain and snow faster but may need more steel and bracing. Flatter slopes save height but need careful drainage and uplift checks.
Most codes in the United States follow ASCE 7 for wind, snow, and rain loads, so confirm those values and the load combinations before you lock the pitch. Once your pitch and loads are clear, the next choices get easier.
Check Local Load Requirements
Do not guess loads. Codes vary by state and even by county. Use official sources to see what your site requires for wind speed, snow load, and seismic category.
FEMA’s Building Code Adoption Tracking pages show what code family a state or local area has in place, and many states publish site design criteria online.
Example: Oregon’s Design Criteria Hub lists ground snow load, basic wind speed, and more for each location. Your state may have a similar page.
Important: Save a screenshot or PDF of the load data page for your permit file. Inspectors would like to see where your numbers come from.
Step 3: Pick the Truss Shape
Shape controls how strong and cost-efficient the roof will be.
Common Steel Truss Shapes for Homes and Shops
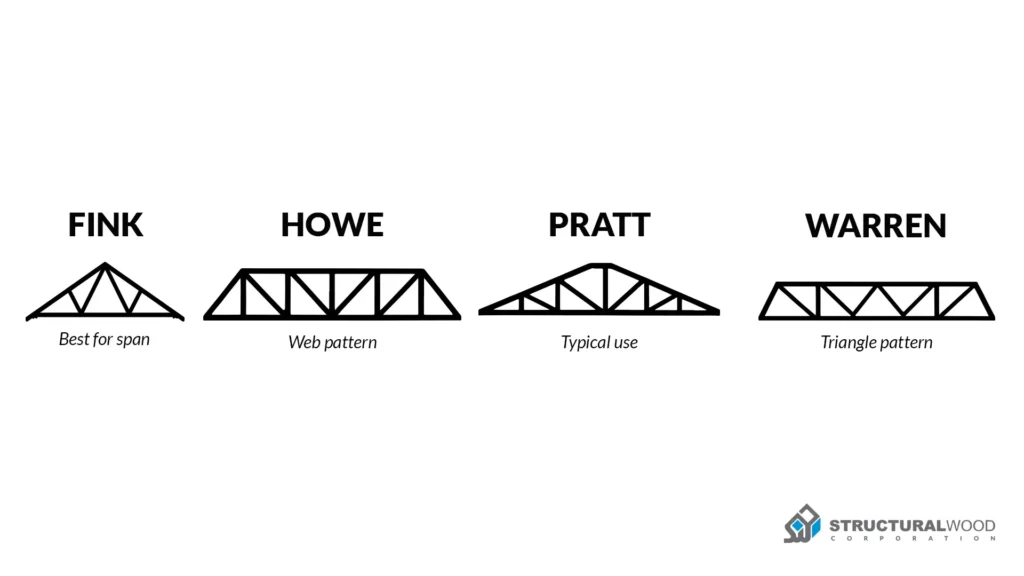
- Fink Truss: A simple web pattern that handles short to medium spans well. Suitable for garages and small shops.
- Howe Truss: Diagonals push toward the center. Works nicely when the bottom chord carries more pull.
- Pratt Truss: Diagonals lean the other way. A smart pick when the top chord takes more push.
- Warren Truss: Triangles of equal size. Clean look and even force flow, but it needs careful joint work.
Quick win: Simple beats fancy. Fewer parts, clean triangles, and straight lines make a safer truss and a smoother install.
When to Use Each Shape
- Short to medium span: Fink or Pratt keeps the weight low and cuts waste.
- Longer span: Warren or Howe spreads force well across many panels.
- High wind or snow: Pick the shape that gives you straight load paths to the supports and allows room for braces.
Builder tip: If two shapes work, pick the one that keeps members at tidy angles near 30 to 60 degrees. Sharp or very flat angles invite trouble.
Map Your Bracing to the Truss Shape
Truss shape sets where braces will go. Plan top chord bracing, bottom chord bracing, and web bracing so the members do not twist. Leave space for purlins, ceiling lines, or mechanical runs. A little planning here stops sway and keeps the roof deck flat.
Note: Pick the shape first, then size the parts. A good shape lets each member do fair work and keeps joints simple. This saves steel and time while raising safety.
Step 4: Size the Truss Members
This is the heart of your design. Strong steel helps, but member layout and balance do the actual work.
Top Chord
This is the roof edge. It takes push from the weight above. Keep the line smooth with steady panel lengths so force flows cleanly. Avoid tiny pieces at the ends. If the span is long, plan for purlins and lateral bracing so the top chord does not buckle.
Shop check: If your top chord line zigzags or has many short stubs, redraw it. Clean triangles beat patchwork.
Bottom Chord
This is the tie that holds the supports together. It lives in pull. Keep it straight, with clear bearing at the ends. If the building will have hanging ceilings or duct runs, note the load now so the chord size and connection holes match the plan.
Web Members
Webs share the load between the top and bottom chords. Aim for neat triangles. Where possible, keep web angles between about 30 and 60 degrees. Try not to stack many webs into one joint. Spread them so every joint feels simple and easy to build.
Builder tip: If a web lands one inch from a brace line, move it onto the brace line. Aligned parts brace each other for free.
Sizing Basics Without the Math Dump
- Start with your loads, span, and slope written down.
- Pick a simple shape that fits those numbers.
- Choose sections that are easy to source in your area.
- Check slenderness: extended skinny members need bracing or a larger section.
- Do a quick connection pass now, not later. If a joint needs five bolts where there is only room for three, upsize the member or change the layout.
Connections Drive Many Choices
If you plan welded joints, leave room to place a full weld and to clean the steel before and after. Confirm plate thickness, hole spacing, and bolt grade early if you plan bolted gusset plates.
It is common to pick a member size and then find that the joint does not fit. Flip that order. Sketch the joint first, then lock the member.
Watch out: Good steel with crowded joints still fails. Space and fit are part of strength.
Corrosion and Finish
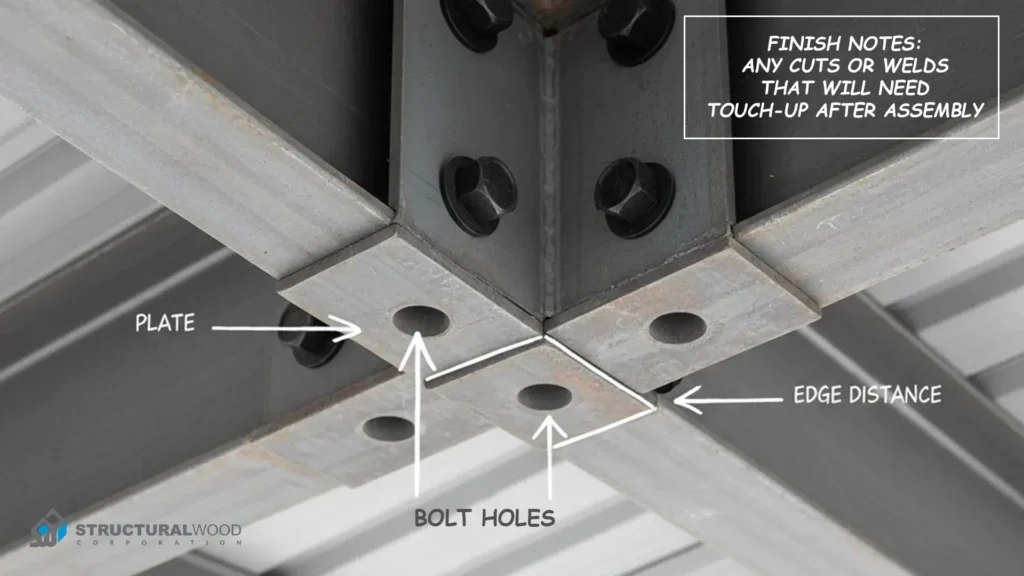
Plan for painting or galvanizing from day one. Note any cuts or welds that will need touch-up after assembly. In coastal or wet zones, seal the joints and choose fasteners that match the coating so you do not mix metals that fight each other.
Trick: Think of members and joints as a team. Clean triangles, sensible angles, and joints with room to breathe will do more for safety and cost than jumping straight to thicker steel.
Step 5: Design the Joints and Connections
Strong steel fails fast if the joints are weak or messy.
Pick a Joint Type That Fits the Job
- Welded joints give clean lines and stiff corners but need a skilled hand and good prep.
- Bolted gusset plates are easier to inspect and replace. They work well for shops and small builds.
Shop choice: If you do not have certified welding help, plan for bolted plates. They are simpler to check and sign off on.
Get Bolt Grade and Spacing Right
Use high-strength structural bolts per ASTM F3125 Grades A325 or A490 and follow the RCSC bolting specification. Keep minimum edge distance and spacing per AISC 360 so the plate does not split or tear.
For bolt spacing, edge distance, and plate thickness basics, see AISC 360 and the Steel Construction Manual. For welding practice and safety, refer to FHWA’s Bridge Welding Reference Manual and OSHA’s welding standards.
Plan Welds for Access and Clean Steel
If you weld, make room for a full weld bead and tool access. Grind rust and mill scale, then weld, then clean and coat.
OSHA outlines basic welding safety steps that improve weld quality, such as ventilation and PPE.
Watch out: Painting over oil, dust, or flash rust will not protect the joint. Clean first, then coat.
Check Plate Thickness and Fit
Thin plates can bend at the joint, and oversized plates add weight without real gain. Match plate thickness to member size and load. Do a dry fit on paper or in a simple CAD sketch to be sure all holes and washers fit without crowding.
Protect Against Corrosion
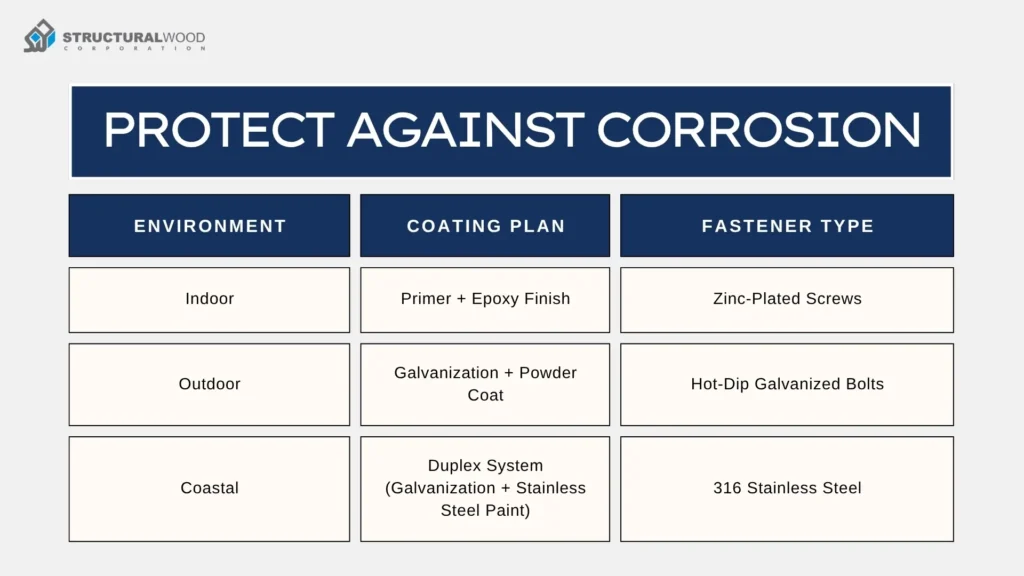
Use a primer and top coat rated for your climate. In coastal or wet zones, use hot-dip galvanizing per ASTM A123. Use matching galvanized fasteners per ASTM A153 or F2329. Do not mix metals that react with each other.
If dissimilar metals must touch, add isolation washers or sealant. After installation, seal all cut edges and field welds with zinc-rich touch-up paint.
Inspect Before You Install the Roof Deck
Run a straight edge across three or more trusses. Shim or adjust the trusses so the deck will sit flat. Check bolt torque, weld continuity, and plate contact. Fix gaps now, not after the roof skin goes on.
Field check: After the first torque, put a wrench on a sample of bolts. If several move a lot, recheck all of them and record values for your file.
Necessary: Give joints as much thought as member size. A clear joint layout, correct bolt grade and spacing, clean welds, and real corrosion protection will keep a strong truss strong for the long run.
Step 6: Get a Professional Review When Needed
Some roof plans are simple. Some are not. Know the line.
Long Spans
If your clear span exceeds what standard light steel sections cover, get an engineer to check member sizes, bracing, and joint forces. Long spans can feel fine on paper but drift or vibrate in real life.
Heavy Snow or High Wind Zones
High wind and snow zones raise the load fast. Uplift at the supports can surprise you. An engineer will set the correct load numbers, add bracing, and size connections so the truss stays put during a storm.
Complex Roof Shapes
Dormers, hips, valleys, and mixed slopes change how force moves through the frame. When shapes meet, joints see odd angles and higher forces. A quick review here avoids a long list of fixes later.
Occupied Buildings and Permits
Shops, homes, schools, and any space where people gather must meet code and insurance rules. Many permit offices ask for stamped drawings for steel roof work. Plan that into your timeline so you are not stuck at inspection.
Reality check: If you are unsure about loads, spans, or joints, you are not ready to order steel. A one-hour review can save weeks of rework.
Want the full foundation on roof truss basics before you lock the design? Read Roof Truss Design, then return here to finish the steel details.
Final Thought
Set the loads first, choose a simple shape, size each member carefully, plan clean joints, and protect the steel from rust. Follow that order, and your truss will work the way it should for a long time.
Small choices matter. Straight lines, tidy angles, solid bracing, correct bolt grade, and clean weld prep turn a plan into a roof you trust.
Structural Wood Corporation can help with plan reviews and package selection if you need support at any stage.
FAQs
Which truss shape works for long spans?
Start with Pratt or Warren, then check your load numbers. This keeps designing steel roof trusses simple and safe.
Do I need an engineer for a steel roof truss?
Yes, if the span is long, the roof is complex, or your area has high wind or snow. Stamped plans often speed permits.
What bolts should I use at joints?
Use structural bolts with the right grade, spacing, and edge distance.
What is typical truss spacing for steel roofs?
It depends on the span, loads, and the roof deck. Your design checks will set the spacing when you plan the design of a steel roof truss.