Most homes in the United States use prefabricated roof trusses for strength and stability.
When you measure roof trusses, focus on four basics that guide everything else: span, height, pitch, and spacing. A small mistake in any of these can affect fit, support, and cost.
Trusses look complex at first glance, so it is easy to feel unsure where to begin. Once you understand what span, height, pitch, and spacing mean, the layout becomes clear, and each step follows the last.
This guide will explain how to measure roof trusses in clear, simple terms. You will learn what to measure, where to place the tape, and how each measurement affects your building plans.
Let’s get into it.
Understand the Main Parts of a Roof Truss
Before you measure roof trusses, know the parts you are measuring. This keeps your tape on the right lines and your numbers consistent.
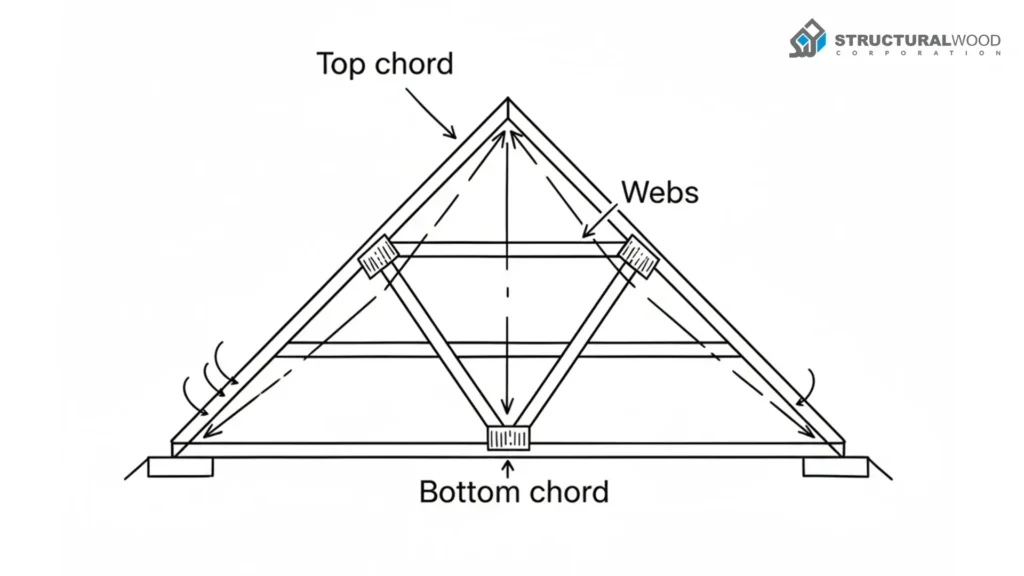
Top Chord
This is the upper member that forms the roofline. It carries the roof load from sheathing, snow, and wind. When you measure roof pitch or check alignment, you will often work along the top chord.
What it means for measuring: Use the top edge when marking pitch and checking straight lines across a row of trusses.
Bottom Chord
This lower member ties the truss together and supports the ceiling. It sets a clear span between bearing walls.
What it means for measuring: Measure the span from bearing wall to bearing wall, then confirm that the bottom chord length matches the plan for that span.
Webs and Joints
Webs are the inside members that connect the top and bottom chords. They transfer the load to the bearings through the joints.
What it means for measuring: You do not measure each web for size, but you do confirm joint locations match the plan, so your plate locations and precise openings are correct.
Pro insight: Use the same edge for every repeated measurement. For example, if you mark pitch on the top edge of the top chord for the first truss, keep using that same edge on every truss. This avoids small shifts that add up later.
Before you continue, take a moment to look at the Roof Truss Design Guide. It explains span, pitch, spacing, and load basics in simple terms, so everything you measure here will make more sense.
Measure the Span of the Roof Truss
Span is the base number that sets the size of your roof. Get this right and the rest will follow.
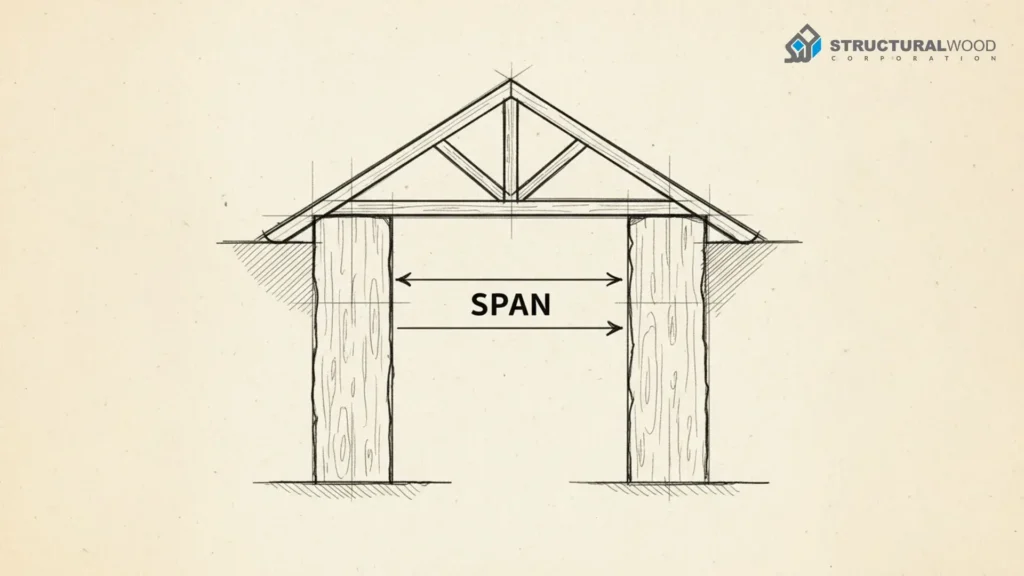
What Span Means
Span is the distance from one bearing wall to the other. Think outside the face of the walls that support the truss. Overhangs do not count in the span.
How to Measure Span Step by Step
Step 1: Find the bearing points
Locate the walls, plates, or beams supporting the truss. Measure the distance between these two supports.
Step 2: Mark the outside faces
Put a small pencil mark on the outside face of each bearing wall or plate. These marks are your start and end points.
Step 3: Pull the tape straight across
Hook the tape on one mark and measure straight to the other. Keep the tape tight, level, and in a straight line.
Step 4: Record the span
Write the distance to the nearest eighth of an inch. Use the same units and format as those shown in your plans.
Step 5: Confirm on the bottom chord
Measure the bottom chord from tip to tip along its straight edge. It should match the plan for that span. Do not include any overhang or tail.
Why does span matter?
The correct span keeps the load path clean from roof to foundation. That helps the house resist wind and quake forces because each connection passes the load to the next part without gaps.
See the Building America guide on a continuous load path and the IRC note that a continuous load path must carry uplift from the roof to the foundation.
Heads up: Plans may use terms like “clear span,” “overall width,” or “building width.” Clear span is the distance between the inside faces of the bearings, while span is often taken at the outside faces. Read the notes on your plan so you use the same reference line.
Quick check: Double-check that you measured the right walls. On additions or L-shaped plans, it is easy to pick a wall that does not carry the truss.
For background on how wood members share load and why support lines matter, see the USDA Forest Service Wood Handbook: Wood as an Engineering Material.
Measure the Height of the Truss

Height, also called rise, sets the feel of a ceiling and an attic room. Get it right, and your roof lines and interior plans will match.
What Height Means
Height is the vertical distance from the bottom chord to the peak of the truss. It works together with span and pitch to set the shape of the roof and the headroom inside.
The idea is simple: more rise means a steeper roof and more volume under it. For background on how roof geometry ties to structure in wood framing, see the HUD Residential Structural Design Guide.
How to Measure Height Step by Step
Step 1: Pick one spot to measure from
Choose a fixed point on the bottom chord, like the center of the span. Use this same point for every truss.
Step 2: Mark that spot
Make a small pencil mark on the bottom chord to find the exact point again.
Step 3: Measure straight up to the peak
Place the tape on your mark and pull it straight up to the highest point of the truss. Keep the tape vertical. Do not follow the slope.
Step 4: Check the number against the plans
Look at the plan notes for roof pitch and overall truss depth. If the plan lists pitch, remember that rise equals run times slope. For example, 3 in 12 means 3 inches of rise for every 12 inches of run.
Step 5: Write it down the same way as the plans
Record the rise to the nearest eighth of an inch. Use the same units and format used in your plans.
Tip: Stand to the side and sight the tape to be sure it is vertical. A tilted tape can make the rise look taller than it is.
Why height matters?
Height influences attic space, ceiling type, and snow and water behavior on the roof. Steeper roofs shed snow and water faster, which can reduce sliding or buildup, depending on the climate and surface.
Quick tip: Measure the same side of the truss every time. Switching sides can add small differences that throw off your set later.
Measure the Roof Pitch
Pitch tells you how steep the roof is. It also links rise and span, so your numbers agree.
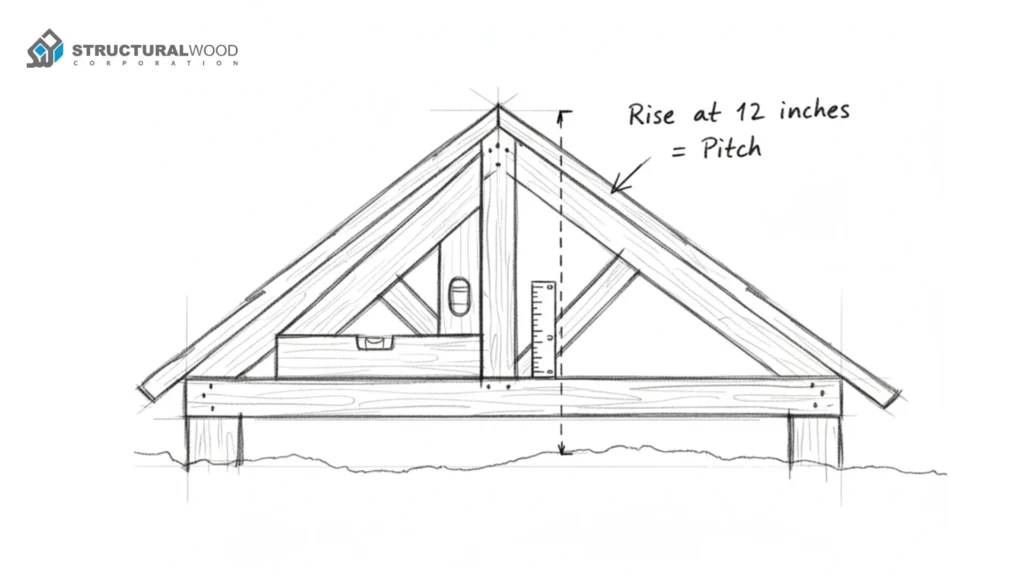
What Does Roof Pitch Mean?
Pitch describes how many inches the roof rises for every 12 inches of horizontal run. For example, a 4-in-12 roof rises 4 inches for each 12 inches of run. This is the standard way to describe roof slope in the United States and is the form used in standard design guides.
How to Measure Pitch with a Level and a Tape
- Set Your Base Run
Mark 12 inches on your level. Hold the level along the roof or along the bottom edge of an exposed rafter. Keep the bubble centered so the level is truly horizontal.
- Take the Rise Reading
From the 12-inch mark on the level, measure straight down to the roof or to the rafter edge. The number you read in inches is the rise. If you read 5 inches, your pitch is 5 in 12.
- Write It the Same Way As Your Plans
Record pitch exactly as “X in 12.” Keep the same format across your notes and your order sheet so there is no mix-up when you size materials.
- Do a Quick Sense Check
If you already measured the rise for the truss, confirm that your pitch and rise agree. For a given span, a higher pitch should match a larger rise.
Safety note: If you must access the roof, follow fall safety rules. OSHA’s rules for residential and walking working surfaces require fall protection on elevated surfaces. Use safe access, fall restraint, or guard systems as required.
Why pitch matters?
Pitch controls how fast water drains and how snow moves off the roof. It also sets which shingles or roof coverings you can use, how the attic vents, and how forces travel into the walls. A clear load path from roof to foundation depends on correct geometry and solid connections at every step.
For a short primer on the load path, see the Building America Solution Center guide on connections from the roof through the wall to the foundation.
Pro tip: If you cannot reach the roof, you can measure pitch from the attic on an exposed rafter using the same 12-inch level method. It is the same idea and often safer.
Confirm the Truss Spacing
Spacing affects load strength, roof deck layout, and cost. Set it right before you start nailing.
Standard Spacing Measurements
Most residential layouts use 16 inches, 19.2 inches, or 24 inches on center. On engineered truss jobs, the exact spacing is shown on the truss design drawings and placement plan prepared under the national truss standard ANSI TPI 1, which is referenced by the residential code. Treat those drawings as your source of truth.
Check Local Building Codes
Your spacing choice must comply with the code adopted in your city or county and the truss standard noted above. The code points you back to the truss design drawings and ANSI TPI 1 for the allowed spacing, so do not exceed what is printed on those sheets. Inspectors will look for those documents.
Why Spacing Must Match Roof Sheathing Size
Roof sheathing panels carry a span rating printed in the APA stamp. The left number in the rating (“24/16,” for example) is the maximum support spacing in inches for roof use.
If your layout is wider than that number, the panel will not meet its rated strength. Pick a spacing the panel can support, and match the thickness and nailing to the rating.
Pro Tip: Matching truss spacing to the panel span rating helps you land panel edges on center and reduces waste during layout. It also keeps the roof deck within its tested strength range.
Double-Check for Uniformity
A straight, even set makes sheathing land clean and keeps loads moving as they should. Catch small shifts now, not after nails are in.
What to check
- Straight: The top edges of trusses line up in a clean line.
- Plumb: Each truss stands upright, not leaning.
- Level bearing: The top plates give a flat nailing surface across the run.
Step By Step: Align Trusses Before Sheathing
- Snap a Control Line
Mark a straight reference line along the top plates where the truss top chords will sit. This is your baseline for alignment.
- Set the First Two Trusses as Anchors
Plumb and brace the first truss at one end and the second at the other end of the run. These act like bookends that hold the line. Use temporary bracing per the BCSI jobsite guide.
- Pull a String Line Across the Tops
Run a tight string between your two anchors from ridge point to ridge point (or a consistent mark on the top chord). Every new truss should just touch the string.
- Check Plumb As You Go
Use a level on the face of each truss. Adjust with temporary bracing before you move on. BCSI shows typical diagonal and lateral braces for this step.
- Verify a Flat Nailing Surface
Place a long straightedge across at least three trusses. Add shims or blocking where needed so the roof deck sits flat. The APA roof sheathing guide says the nailing surface must be level before you install panels.
- Lock the Temporary Restraint
Install continuous lateral braces and diagonals as shown on the truss drawings or BCSI sheets. Do not remove temporary bracing until permanent bracing and sheathing are in place.
Why is this important? Uniform alignment lets the roof deck span as rated and helps maintain a clean load path from the roof to the walls and down to the foundation. This is a core safety idea in national guidance on continuous load paths.
Field checklist:
- String the line tight and untouched.
- Every truss is plumbed before nailing.
- Straightedge shows a flat nailing surface.
- Temporary braces were installed and tied off.
When to Involve a Professional
Some roof styles and sites need an expert to check the numbers and the details.
Attic Trusses
Attic trusses carry room and roof loads, so the design must account for floor stiffness, bearing lines, and support details. These trusses should be engineered and come with truss design drawings that your inspector can review.
The residential code points to truss design drawings prepared to the truss standard and approved before installation.
Custom Rooflines
Dormers, intersecting roofs, and long spans change how forces move into the walls. The safe route is to have a licensed design professional review the layout and the truss package, then provide the drawings you will use on-site.
The IRC requires submittal of truss design drawings for approval, and jurisdictions may require a registered design professional to prepare them.
Heavy Snow or High Wind Areas
Loads vary by county and site. Use the ASCE Hazard Tool to get your local ground snow load and wind speed, then size the system with a professional so the roof and its connections meet those values. A clear, continuous load path from roof to foundation is the goal in national guidance.
Important: Local loads vary by county. Always verify snow and wind with a licensed engineer and submit truss design drawings for approval before you build.
Conclusion
Measuring roof trusses does not have to feel confusing. Once you lock in span, height, pitch, and spacing, the rest falls into place. Your layout lands clean, your roof deck fits, and your plans match what gets built.
If you want a quick safety net, keep a copy of your truss drawings nearby and double-check each step as you go. Small checks now save time and cost later.
Structural Wood Corporation can help you review truss dimensions, read your drawings, or plan a clean site layout. Contact us for a quick check or a fast quote.
Frequently Asked Questions
How do I measure roof trusses on an existing house?
Pick a fixed point on the bottom chord at midspan from the attic, then measure straight up to the ridge for height. For span, measure from the outside face of one bearing wall to the other. This is the simplest way to measure roof trusses without climbing.
What tools do I need to measure roof trusses accurately?
Tape, a level with a 12-inch mark, a pencil, and a straightedge. These covers span, height, pitch, and spacing so that you can measure roof trusses with clean, repeatable steps.
Can I measure roof pitch without going on the roof?
Yes. In the attic, place the level along an exposed rafter, hold it level at 12 inches, then measure the rise straight up from that mark. That gives your pitch to help measure roof trusses.
Do all roof trusses have the same spacing?
No. Standard layouts are 16, 19.2, or 24 inches on center, but you must follow the spacing printed on the truss design drawings. Use that value when you measure roof trusses for layout.
What happens if my measurements are a little off?
Minor errors can throw off fit, deck support, and cost. Recheck span, height, pitch, and spacing before cutting or ordering. A careful second pass will keep your plan to measure roof trusses on track.