Planning to build wooden trusses but not sure where to begin?
If you are searching for how to build wooden trusses, you want a clear, reliable path that keeps your roof safe and straight.
Building trusses is not just cutting wood and joining pieces. It is about precise marks, balanced angles, and a plan that holds up over time. When you follow the proper steps, a wooden truss can support heavy loads and form the backbone of a strong roof.
This guide shows each step, from planning and design to assembly and installation so that you can build wooden trusses safely and confidently.
Let’s get into it.
Understanding Wooden Trusses
What Wooden Trusses Do
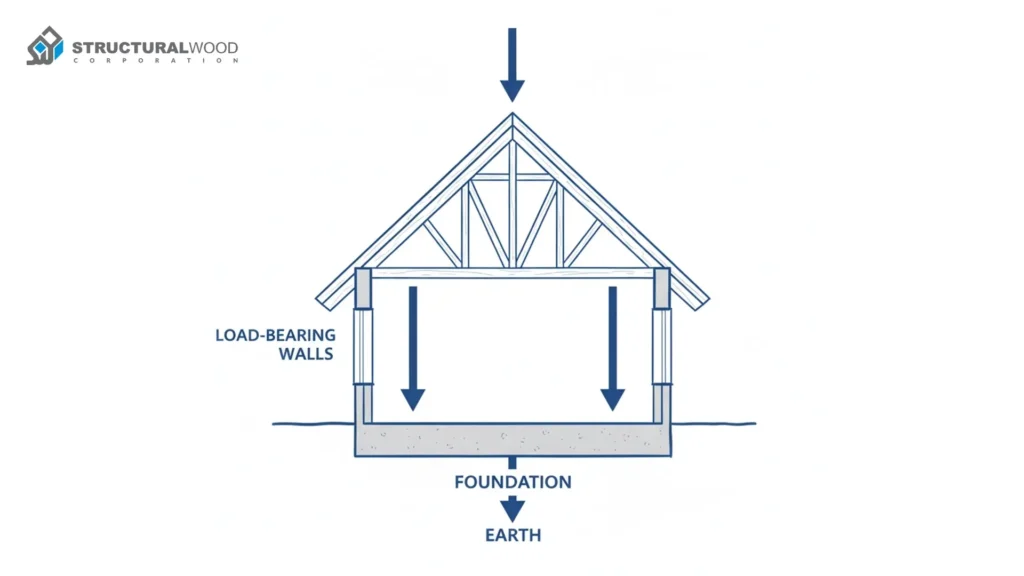
A wooden truss spreads roof loads across the walls and down to the foundation through a clear load path. When that path is continuous, the roof stays steady in wind and during earthquakes because the forces have a clear route to move through the frame.
Try this insight: Think about the whole path, not the separate parts. If every connection from the roof panels to the chords to the wall plates is strong, the roof works together like a team, not as lone pieces.
Common Types of Wooden Trusses
- King Post: Short spans with a single central web.
- Queen Post: Slightly longer spans with two posts and a straining beam.
- Fink: The classic W shape for efficient use of material on moderate spans.
- Howe and Pratt: Webs are arranged to place more members in tension or compression based on span and load needs.
Tip: Pick the truss for the span and loads you expect, not for the shape you like. Spans, roof pitch, snow, and wind are the real deciders. For design basics, always confirm with code guidance or an engineer.
What to Do Before You Start Building
Strong trusses start long before the first cut. If your space is flat, your tools are ready, and your numbers are precise, the build feels simple instead of stressful.
- Set Up Your Workspace
- Pick a flat, dry area with good light.
- Sweep the floor so the boards sit flat.
- Keep kids and pets away while you work.
Quick check: Your surface is not flat if a board rocks on the floor. Shim your jig or move to a flatter spot.
- Gather Tools and Materials
- You will need a tape measure, framing square, pencil, circular saw, drill, clamps, hammer, level, and safety gear.
- For materials, plan for chords, webs, truss plates, fasteners, and temporary bracing.
Heads up: Buy a little extra lumber for mistakes and test cuts.
- Check Your Building Codes
- Call your local building office or visit their website.
- Ask about roof loads, permits, inspections, and any special rules for wind or snow in your area.
Watch out: Do not cut a single piece until you know the required span, pitch, spacing, and lumber grade for your truss plan.
- Plan Your Measurements
- Write down your span, rise, and roof pitch.
- Sketch one truss with all lengths and angles.
- Mark where each web goes.
- Keep this sketch next to you while you work.
Pro tip: Measure twice, cut once. A small error at one joint can cause the whole truss to fall apart.
Learn the Basics Before You Cut
A few minutes of learning can save hours of rework. Get the numbers right first, and the saw work becomes smooth.
Before you start cutting or assembling, read our Roof Truss Design Guide. It explains span, pitch, spacing, and lumber grades in clear, simple words so your plan matches what engineers expect and what code requires.
Shortcut: Read the guide first, then follow the steps. This will help you save time and avoid mistakes later.
Step by Step: How to Build Wooden Trusses
Build slow, measure right, and the rest feels simple. Good prep makes each cut and joint feel easy.
Step 1: Measure and Mark Your Lumber
Lay out the bottom chord and top chords on a flat floor. Mark every cut line and joint location with a sharp pencil. Label each piece so you do not mix them up.
Quick check: If two marks that should match do not line up, stop and remeasure.
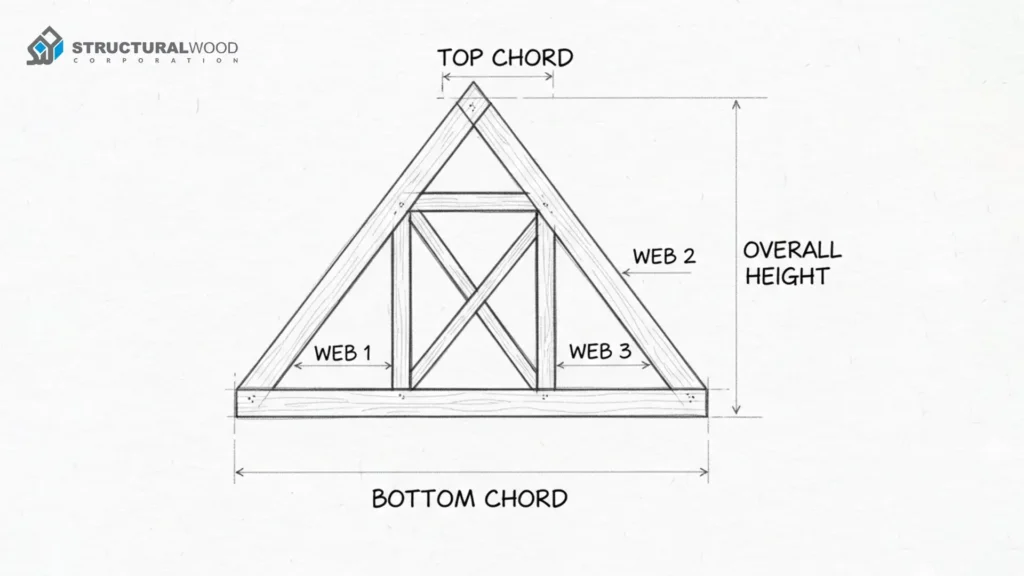
Visual placeholder: Top-down sketch that shows a bottom chord, two top chords, and lines where webs will sit. Labels for each piece.
Step 2: Cut Chords and Webs
Use a circular saw for straight cuts. Keep your hands clear. Cut slowly so the blade does not wander. Stack same-length pieces together.
Safety note: Wear eye and ear protection and snug gloves. Keep the cord clear of the blade.
Common mistake and fix: If a cut is a little too long, the joint will show a gap. Trim a small amount and test the fit again.
Step 3: Build a Simple Jig on the Floor
Screw two straight boards to the floor to hold your truss shape. Set them at the exact span and pitch. The jig keeps every truss the same.
Pro tip: Use a framing square at each corner of the jig so the triangle sits true.
Step 4: Dry Fit the Pieces
Place the bottom chord, top chords, and webs in the jig. Push the joints tight. Check that all points are in touch with no gaps.
Heads up: If a web is too tight, shave a bit. If it is loose, recut that piece. Do not try to “nail it tight.”
Step 5: Install Truss Plates
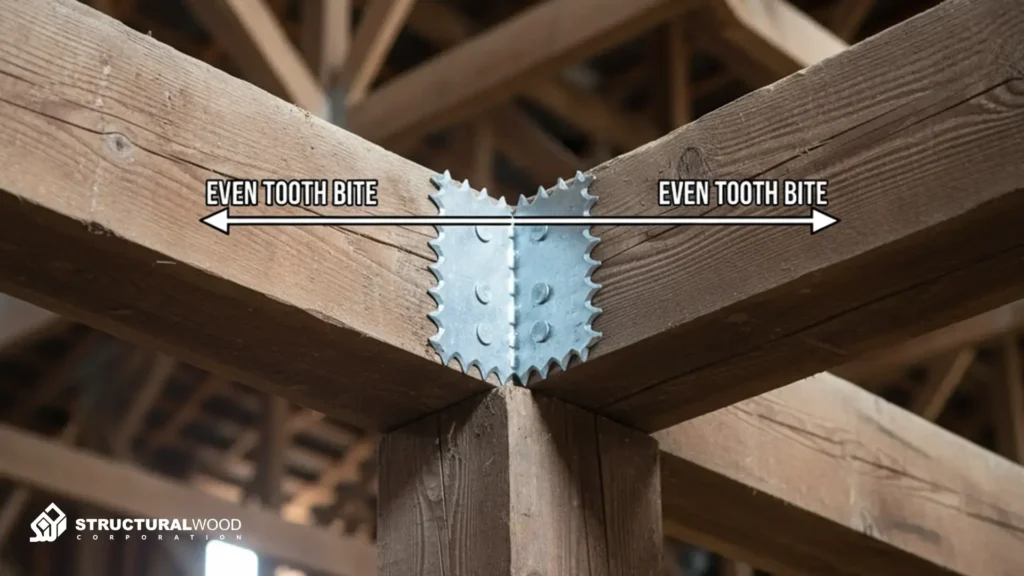
Center a metal plate on each joint. Tap it so the teeth start, then drive it home with a hammer or a plate press. Flip the truss and plate the other side.
Reminder: Plates must sit flat and centered. If a plate bends, replace it. Do not reuse bent plates.
Step 6: Check Square and Add Temp Bracing
Set a level on the bottom chord. Measure corner to corner. The two diagonal measurements should match. Add a straight board across the truss as temporary bracing to hold its shape.
Quick check: If the diagonals are off, nudge the top chords in the jig and recheck before moving on.
Step 7: Lift and Set the Trusses
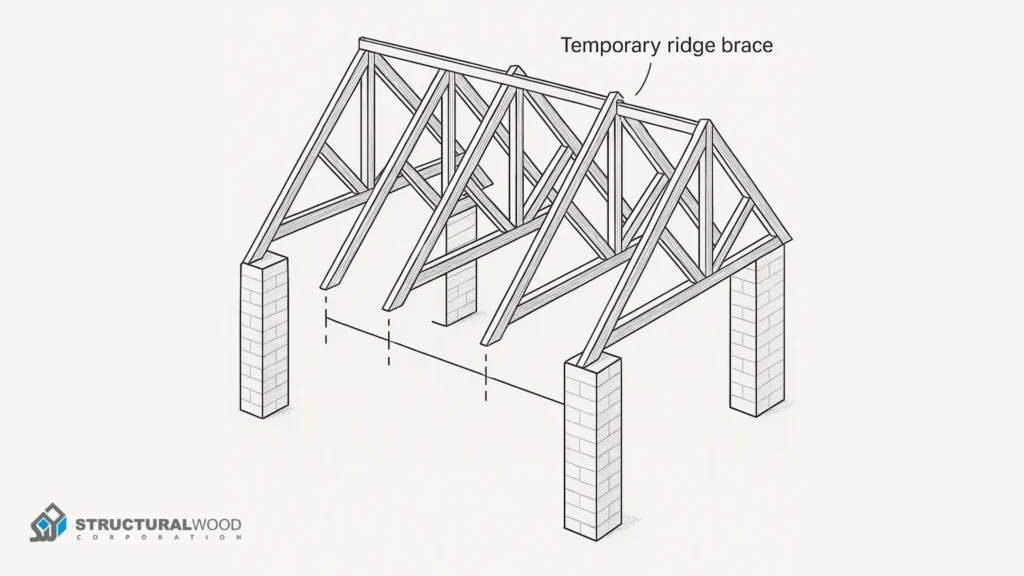
With helpers, carry the truss to the walls. Stand it up and seat it on the wall plates at your planned spacing, often 24 inches on center. Nail it to the top plates and add a ridge brace to hold it plumb. Keep adding trusses and bracing as you go.
Safety note: Use at least two helpers for lifting. For large spans, use a small crane. Never work under a suspended truss.
Step 8: Tie It All Together
Once several trusses are up, add permanent bracing as your plan shows. Install roof sheathing to lock the system. Remove temporary bracing only after the sheathing is on.
Insight: The roof gets strong when the parts work together. Tight joints, straight lines, and solid bracing make the whole frame act as one.
Final Checks to Keep Your Trusses Strong
The build is only as strong as its final checks. A few minutes of inspection can save you from costly fixes later.
Check for Straight Lines
Lay a long level or straight board across the tops of your trusses. The surface should look even from end to end. If one dips or rises, loosen its brace and reset it before fastening the sheathing.
Quick check: Stand at the gable end and look down the truss line. The chords should form one clean, straight line.
Tighten Your Joints
Walk around the frame and press on each connection. None should move or creak. Drive any loose nails back in or replace weak plates.
Tip: A light tap with a hammer that changes the sound from dull to sharp often means the plate is fully seated.
Add Permanent Bracing
Install diagonal bracing between trusses from the ridge to the wall. Secure them firmly at both ends. This keeps the roof steady during wind or movement.
Reminder: Do not remove any temporary bracing until permanent bracing is complete.
Confirm Measurements One Last Time
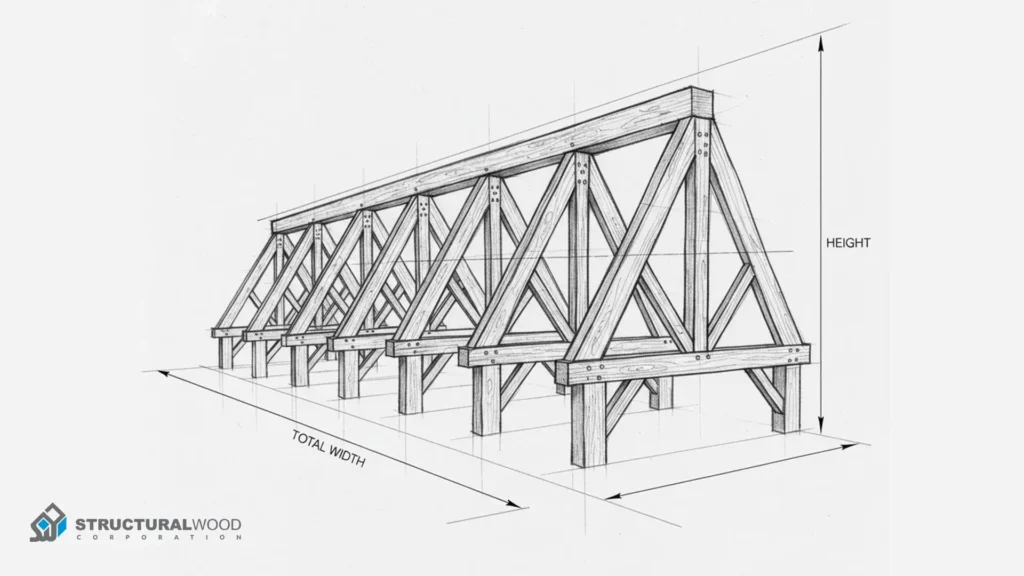
Measure from one gable wall to the other to ensure even spacing. Check the height from the top plate to the ridge on both ends. Everything should match the plan.
Pro insight: Many roof issues start from a rushed inspection. A few extra checks here can keep the structure safe for decades.
Common Mistakes to Avoid
Even careful builders slip up. Knowing the most common mistakes before you start can save you time, money, and frustration later.
| Mistake | What goes wrong | Quick fix | Helpful note |
| Skipping the measurements | Joints do not meet, and trusses turn uneven and weak. | Write every cut length and angle. Mark each board before cutting. | Measure twice, cut once. |
| Uneven spacing between trusses | The roof load does not spread evenly. Sagging or stress at some joints. | Use a spacer or measuring stick to keep 24 inches on center. | Check spacing at both ends of each truss. |
| Forgetting to brace during installation | Trusses twist or can fall while you work. | Brace each truss as soon as it is set. Add a ridge brace early. | Never walk on an unbraced truss. |
| Using the wrong nails or plates | Fasteners rust or loosen over time. | Use galvanized nails and steel truss plates. | Replace any bent or damaged plate. |
| Rushing the final inspection | Hidden gaps and misaligned joints cause future problems. | Look down the line of trusses, check the two diagonal measurements, and tighten the plates. | Fix minor issues now to avoid big repairs later. |
Pro Tip: Most roof problems start with minor mistakes, not bad materials. A straight, evenly spaced, and well-braced truss will always last longer than one built in a rush. Take the time to double-check every joint before moving to the next step.
Final Thought
You do not need to rush to build strong wooden trusses. Clear numbers, careful cuts, and regular checks make a roof last. When each piece is measured right and braced well, the whole frame works as one.
If you would like an experienced person to review your truss plan, Structural Wood Corporation can help. We design and supply trusses that meet engineering standards and local codes. Contact us for a quick review or a free quote, and we will guide you.
Strong roofs start with smart steps. You are already on the right track.
Frequently Asked Questions
Can I build wooden trusses myself?
Yes. Follow your local code, use quality lumber, and check every joint before fastening.
Do I need a permit or inspections?
Most areas require a permit for roof framing. Always confirm with your local building office first.
What lumber size and grade should I use?
It is usually 2×4 or 2×6, but the exact size depends on the span and load. Check your design plan for the precise sizes.
How far apart should I set the trusses?
Typically 24 inches on center, but spacing can change with roof type or code.
Can I use screws instead of nails with truss plates?
No. Truss plates are built for specific nails. Use the fasteners listed in your plan.